Where each boss shows up, its weak point and how to beat it step by step.
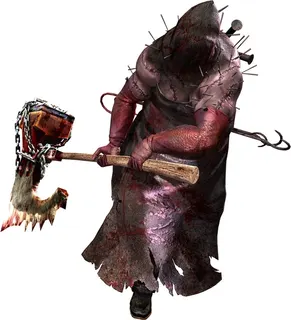
1-1 · Kijuju: checkpoint and town · Kijuju's Public Assembly, during the siege. He appears after the cutscene next to the explosive barrel right of the gate: he smashes the gate and breaks through the wall.
Weak point No weak spot: all damage counts. Hand Grenades, Proximity Bombs and most Grenade Launcher rounds always make him kneel; shots around the head do too. Burning petrol and transformer surges hurt and stun him.
A 235 cm, 130 kg brute swinging a guillotine blade on a chain. He is optional: the square runs on a hidden timer and, when it ends, Kirk blows the second gate with a rocket and the chapter ends. Killing him is a race against that clock, and it is the only way to get the Gold Ring.
He can't be killed before he breaks the gate. He is slower than the Majini and his swings kill them too: let him clear the square for you. If you'd rather not fight, get on a rooftop with no stairs or into the crashed bus (one entrance): in the campaign he can't jump or climb.
- While he breaks the gate, get away from the crowd and have your Hand Grenades ready.
- Lead him through the petrol-soaked debris between the bus and the buildings (shoot it to light it) and past the electric transformers (shoot them when he is close).
- Throw a Hand Grenade or leave a Proximity Bomb in his path: he kneels. Run in and use the melee prompt (Chris: Uppercut; Sheva: Somersault).
- Hit him again while he recovers for the finisher (Chris: Straight; Sheva: Roundhouse). Back off right after the combo, especially if his back is turned: he turns with a fast axe swing.
- Keep shooting around his head while he is down. On replays a shotgun or magnum cuts the fight short.
- In co-op, one player keeps him busy from the bus or a rooftop while the other knocks him down and finishes.
Reward: Gold Ring (₦5,000). Bonus Features figurine: 10 BSAA Emblems and Chapter 1 cleared.

1-2 · Urban District and Furnace Facility · Urban District: the 2nd floor of the building across the street from the blue-door hut (the one with the Ithaca M37). You climb its outside stairs after taking the shotgun and find her inside with a male Majini.
Weak point Before the Plaga emerges: a leg (stops her and her grabs) and then the rear finisher. Once the Cephalo is out: the Plaga, not the body. A Flash Grenade or Flash Rounds kill it instantly.
The blonde woman Chris and Sheva try to rescue. She has more health than a Town Majini and, after some damage, her head bursts into a long-reach Cephalo. Kill her before that: a leg shot and a Neck Breaker (Chris) or Throat Slit (Sheva) from behind, an instant kill that keeps the Plaga in.
The noise brings more Majini through the windows and both doors. Hold a corner; grenades help in the small room, but mind your own blast.
- Take the Ithaca M37 in the hut before you cross the street: the shotgun makes short work of her.
- Shoot a leg. While she staggers, circle behind her and use the rear finisher (Neck Breaker / Throat Slit). She dies with no Plaga.
- On replays the Stun Rod, the Rocket Launcher or Nitrogen Rounds also stop the Plaga from coming out.
- If the Cephalo comes out, back off (its whip reaches far) and shoot the Plaga: leg shots no longer stop her. A Flash Grenade kills it outright.
- On the way down the stairs a radio call brings 4 more Majini: reload first.
Reward: Ivory Relief (₦2,000), every time.
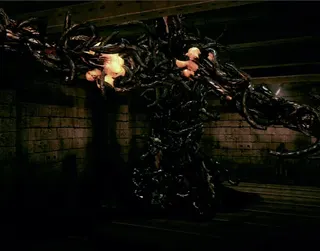
1-2 · Urban District and Furnace Facility · Furnace Facility: it appears in the main passage and the fight happens in the square furnace room, which has a control panel and 2 gas cylinders.
Weak point An orange core that sometimes shows on its arm-like part. The furnace kills it in one go on Amateur and Normal. The gas cylinders, once it has absorbed them.
A Kijuju man the masked Jill injected with Uroboros: he rejected it and became a mass of tentacles. It appears when you take the Furnace Key from the corpse by the furnace controls and head back to the locked door.
There are two ways: the furnace trap (fast and free, but it melts the Gold Ring) or gunfire (slower, but it drops the ring). Use the furnace on a first run and come back for the ring on a replay with strong weapons. Its hits attach leeches that drain your health for a while.
- Before the fight, knock over the 2 gas cylinders in the furnace room (you can do it before taking the key).
- Don't shoot. Fall back down the narrow corridor into the furnace room: a shutter seals behind it when it enters.
- If it passes a knocked-over cylinder, it absorbs it. Shoot the cylinder once it is inside, not while it is only nearby.
- Furnace: lure it into the furnace chamber, step out and hit the control panel at once (or tell AI Sheva to). A few shotgun blasts keep it inside while the door closes.
- Gunfire (replays): Gatling Gun, Rocket Launcher or S&W M500, plus the cylinders and Hand Grenades. This way it drops the Gold Ring.
- Afterwards, use the Furnace Key on the locked door: no enemies are left until the end of the chapter.
Reward: Gold Ring (₦5,000), only if you kill it without the furnace. "Uroboros" figurine: 10 BSAA Emblems and Chapter 5 cleared.
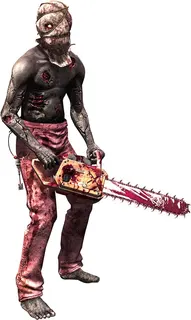
2-1 · Port and Shanty Town · Shanty Town: he bursts through a door as you climb the stairs toward the exit gate. 5–6 Majini come with him and seem to respawn. At the foot of the eastern stairs there is a transformer on a pole and explosive boxes.
Weak point The head (shotgun, machine gun, S75) and his hands as he raises the saw: he staggers and opens the melee combo. An explosion, a Flash Grenade or a leg shot makes him kneel.
Tall, lanky, with a bag over his head. One chainsaw hit decapitates you; caught by the tip only, you go into DYING. He is slower than a normal Majini: keep your distance, aim for the head and melee when he staggers.
Watch the Majini with him: if one grabs you, the chainsaw can finish you off. Kill whoever gets close first.
- Fall back to the transformer on the pole at the foot of the eastern stairs and the explosive boxes; lead him past them and shoot them.
- Shoot his head or hands when he raises the saw. If he staggers: Hook / Twist Kick, then Straight / Roundhouse.
- Explosion, blinding or a leg shot → he kneels → Uppercut / Somersault.
- An Incendiary Grenade burns him and the crowd; Hand Grenades work too. You can also kick a door open into him.
- If he falls slowly, saw in both hands, face up and with the chain still running, he will get up berserk: back off and use a rifle or machine gun. One grenade or Proximity Bomb stops the charge; a second kills him. He is truly dead when the saw goes silent.
- Pick up the Guard's Key. You can grab it and run: there are no enemies past his door.
Reward: Guard's Key (needed to leave). Past the gate, a chest with gold and gems. Figurine: 10 BSAA Emblems and Chapter 2 cleared.
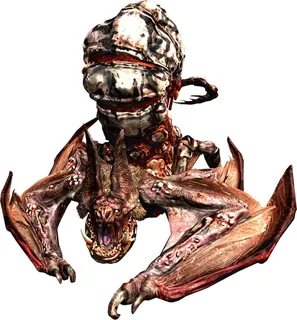
2-2 · Train Station and Mines · Mining Area: a circular clearing you drop into from the crate area at the end. A Majini crashes an armoured truck and the Popokarimu climbs out of the wreck. The sheds hold Proximity Bombs (5 or 6), a Hand Grenade, a Flash Grenade, handgun ammo and a Herb (Green).
Weak point The tail, which is the Plaga: a bullet-deflecting shell with a soft interior underneath that glows red in the sunlight. A strong hit on the tail while it flies drops it. Fandom says it takes double damage from fire and 40% less from shotguns (unsourced).
A Tricell bat implanted with a Plaga: four talons, body slams, flight and a sticky spray from the tail that pins you if you stand behind it too long. You can't hurt it from the front: you have to knock it over to expose the tail and belly.
The classic split: one player kites it in a circle, the other loots the sheds and plants Proximity Bombs in its path. When it steps on one it falls on its side and you both unload into the tail. Don't hide in the sheds: one swipe flattens them.
- Go round the sheds and collect the Proximity Bombs (and the Flash Grenade).
- Plant a mine in the middle, in its path, and stay out of the blast. One player lures it, the other waits.
- When it falls on its side, switch to the H&K MP5, the S75 or the Dragunov SVD (the shotgun does far less damage to it) and shoot the tail. A stock Dragunov SVD needs about 15–20 hits on the weak spot.
- If it flies, a strong hit on the tail brings it down stunned; a Hand Grenade knocks it out of the air too.
- If the sticky spray catches you, mash the prompt or have your partner free you. A Flash Grenade stuns it long enough to get away.
- Repeat until it screams, climbs and dives: cutscene, and Dave Johnson arrives in the Gambit.
Reward: Nothing: the Soul Gem belongs to the 4-1 rematch. Once you clear the chapter the shop starts selling Proximity Bombs (from 2-3). Figurine: 10 BSAA Emblems and Chapter 2 cleared.
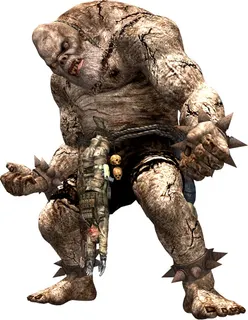
2-3 · Savannah · End of the Savannah: the destroyed Delta Team outpost. You don't move: Chris on the Gambit's top Mounted Machine Gun, Sheva on the lower one.
Weak point The head: it interrupts almost every attack. Then the Plagas that sprout: 2 small ones, the big one on the spine, 4 small ones (chest and arms) and the spine one again. The oil canisters nearby.
The largest humanoid Plaga B.O.W., built from El Gigante data with five Plagas implanted: it only dies when all of them are gone. It rips up poles and boulders to throw at you. Before the fight it kills Dave Johnson in a cutscene.
Shoot his face nonstop, but in bursts: the guns overheat, and being unable to fire at the wrong moment can kill you. Town Majini support him and respawn (you hear a laugh or a cry): 2 crossbow Majini on the right and 1 Molotov Majini on the left.
- Both players on the face until he flinches. Foot raised to stomp the Gambit: shoot the face or the leg. Leaning back with fists together: shoot the head as it starts.
- Phase 1: 2 small Plagas sprout. One player kills them while the other keeps hitting the face. Then the big Plaga bursts from the spine: both shoot it until it retracts.
- Phase 2: 4 small Plagas (chest and arms), then the big spine Plaga again. Killing it kills Ndesu. You may need the cycle once or twice more.
- Boulder: shoot it apart or shoot the barrel to his right. Pole: follow the dodge prompts; shooting the nearest canister makes him drop it.
- Oil canisters: blow one when he is close (holding a boulder or pole, or with 4 Plagas out) for heavy damage and a stun. One of them is only there to take out a crossbow Majini.
- Clear the support Majini while he is stunned.
- Charge: if Sheva shouts "Something's wrong with him! Watch out!" or Chris "I don't like the looks of this! Keep firing!", keep shooting his head: the body tackle can take over half your health.
Reward: Nothing. Figurine: 10 BSAA Emblems and Chapter 2 cleared.
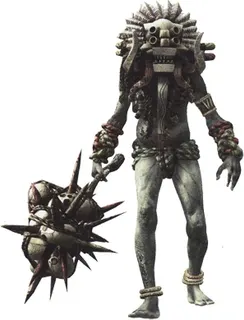
3-1 · Marshlands and Village · 4-2 · Worship Area and Pyramid · 3-1: the Village, 2 in the closing ambush. 4-2: Worship Area, 1 when you take the Sea Emblem (south-west section) and 1 when you take the Sky Emblem (north-west section).
Weak point The head is completely bulletproof. Shoot the torso, back or legs. One magnum shot makes him kneel. Hand Grenades and Proximity Bombs. Handguns and machine guns barely scratch him.
Ndipaya men grown to almost 3 m by the Type 3 Plaga, swinging spiked maces decorated with skulls. Their war cries call other Majini, and their swings hit those Majini too.
Stay as far away as you can. With a shotgun, rifle or magnum: make him kneel, melee, and back off again. If you are in DYING, his stomp kills you: have your partner revive you before he gets there.
- First use the rifle to thin his escort before it closes in (4-2 especially).
- Shoot his legs or torso: one magnum round makes him kneel; otherwise shotgun or rifle.
- Kneeling: arm melee (Hook / Twist Kick). If he blocks with crossed arms and slides back: leg melee (Uppercut / Somersault). Recovering from your hit: the front combo finisher.
- Hand Grenades and Proximity Bombs in his path deal big damage.
- Kill him: if you run, there is no gem. In 4-2 each emblem (Sea Emblem and Sky Emblem) wakes one; take them in any order.
Reward: Blue Enigma (₦3,000) each: 4 in total (2 in 3-1, 2 in 4-2). Figurine: 10 BSAA Emblems and Chapter 4 cleared.
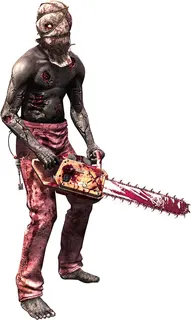
3-2 · Execution Grounds and Oil Field · Oil Field Refinery: 2, one when you ride the zip line to the south-west platform and one when you unbar the gate on the southern centre platform. Control Facility: 1, who arrives by the elevator during the escape with Josh along the iron walkway.
Weak point Same as in 2-1: the head and hands to stagger him, the legs to make him kneel. A magnum speeds everything up.
The same Chainsaw Majini as in Shanty Town, three of them this time. One chainsaw hit decapitates you and a graze puts you in DYING. The refinery is wide open: here you can snipe them before they close in.
If your weapons are weak, IGN suggests bringing 10–15 Proximity Bombs to this chapter: lure him onto one, hit him while he is down, repeat.
- IGN: take the zip line to the platform with the door first; it triggers a checkpoint.
- Shoot his head from range with the rifle; when he staggers, melee combo and back off again.
- Proximity Bomb in his path: he falls, hit him while he is down, repeat.
- Use any barrels or transformers nearby: lead him past and shoot them.
- If he gets up berserk with the saw running, shoot him from range; one grenade stops the charge and a second kills him.
Reward: Refinery: Venom Fang (₦3,000) each, the only 2 in the game. Control Facility: Gold Ring (₦5,000).
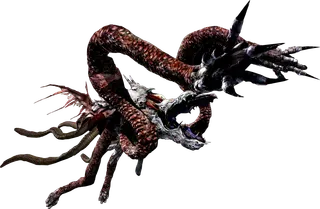
3-3 · Drilling Facilities · The patrol boat, on the water. It has **2 Mounted Machine Guns** and **2 Mounted Launchers** toward the bow, and a First Aid Spray at the stern.
Weak point Phase 1: the bulging middle (the black mark) of each spiked tentacle and, when he surfaces, the pale circular patch on his "forehead" (flashes red when hit). Phase 2: Irving's human body on the tongue and the tentacles gripping the boat.
Irving injects a parasite derived from the control Plaga and turns into a giant fish-mollusc with tentacles and an oyster-like mouth full of teeth. He is fast in the water, but his rapid mutation leaves a core exposed.
IGN: use only the turrets and save your own ammo. Man the Mounted Machine Gun on the side he is on; your partner takes the other machine gun (if he is behind) or a Mounted Launcher (if he is at the side). A missed QTE often means instant death: keep your hands ready and step off the turret to dodge.
- Phase 1: he submerges and raises spiked tentacles (IGN: four) on one side. They lock onto where you stood when the attack began: keep moving. Destroy them by shooting the bulging middle.
- He surfaces: shoot the pale patch on his head. Then he charges and bites: dodge. Repeat on the other side.
- Watch his map icon: if it charges the boat, the bite over the deck is coming (QTE or move away). If a tentacle grabs someone, the other player shoots it to make it let go.
- Shortcut: one hit from your own Rocket Launcher (the 3-1 one, not the turret) anywhere on Irving skips all of phase 1.
- Phase 2 (stern): cutscene; he grabs the stern and opens his mouth. Shoot Irving's body on the tongue and the tentacles holding the boat, using both machine guns.
- If you don't do enough damage he lets go, submerges and lunges to bite again: back off or follow the QTE, and repeat.
Reward: Nothing. His dying words point to "the cave". "Irving (Transformed)" figurine: 5 BSAA Emblems and Chapter 3 cleared.
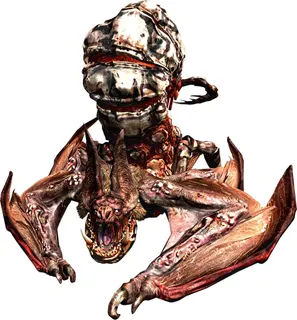
4-1 · Caves, Ancient Village and Labyrinth · The Labyrinth: it flies down through an opening in the ceiling when, after pulling the chains on the last (red) statue, you try to leave.
Weak point The fleshy red underside of the tail; the armoured front deflects bullets. While it flies only tail hits count, and a strong one brings it down.
The rematch, against an armoured Popokarimu. It is optional: you can run up the stairs and a QTE crushes it in the tunnel, but then there is no Soul Gem (₦10,000, its only source).
To kill it, stun it first and unload into the tail. Just before, a silver case holds the Grenade Launcher with 12 Explosive Rounds: on Normal its starting ammo is enough; on Veteran and Professional you need other weapons as well.
- Mine trick: before pulling the last statue's chains, plant a Proximity Bomb roughly in the middle of the room. It walks over it before attacking and, with upgraded weapons, dies during that first stun. There is a mine in a vase in the room next to the lower 4th statue.
- No mine: a few direct Explosive Rounds from the Grenade Launcher or Hand Grenades stun it. Don't fire the launcher up close: the splash hurts you.
- Once it flips, go for the tail: a well-upgraded M3 needs "a half-dozen shots" (IGN). The S&W M500 takes 5–6 shots to the head.
- A Rocket Launcher to the head, without stunning it first, usually kills it outright. Flash Rounds take 12–13 direct hits.
- To escape instead: run up the stairs and mash the QTE; fail it and you die.
Reward: Soul Gem (₦10,000), only if you kill it. Escaping gives nothing.
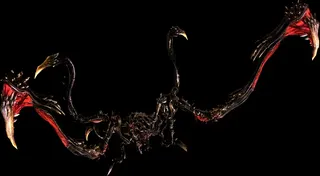
5-1 · Underground Garden and Experimental Facility · Experimental Facility: the revolving elevator platform. Checkpoint on arrival. On arrival: handgun and machine-gun ammo, a Hand Grenade and shells; on the platform, a Herb (Green) and more shells.
Weak point The red fleshy parts of the legs near the joints, and the open mouth. Aim at the upper part of the exposed flesh: the lower part sometimes absorbs shots as if it were armour.
A Tricell base-defence B.O.W. built from several arthropods (mostly crustaceans); its shell withstood anti-tank rockets in testing. It carries flying Drones in its abdomen.
It arrives with a dodge QTE: fail it and you die. Then circle the platform, shoot the legs until it collapses and drop a Hand Grenade into its mouth. Its pincer grab is game over.
- Keep your hands ready for the QTE in the opening cutscene.
- Keep to the edge of the platform, away from its front (most of its attacks are frontal). Circling the central pole avoids some hits.
- When it pauses, shoot the orange leg joints (shotgun, machine gun, magnum or rifle) or the open mouth.
- It collapses onto the platform with its mouth open: run to its head and use the prompt to drop a Hand Grenade into its mouth. Keep shooting the head just above the mouth.
- Repeat. One source counts 3 grenades to kill it. With no grenades, shoot into the mouth and the exposed head.
- Low on ammo or out of grenades? Wait for it to release Drones and kill them: they drop ammo, herbs and grenades.
Reward: Nothing. Figurine: 10 BSAA Emblems and Chapter 5 cleared.
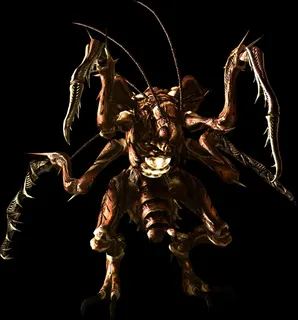
5-2 · Power Station and Missile Area · 5-3 · Uroboros Research Facility · 6-3 · Hangar and Volcano · 5-2 Missile Area 1F: 1, hatches when you restore power to the conveyor and drops from the ceiling on the way back. 5-3 Missile Area 2F: 4 egg sacs on the walkway, but only **2 or 3** hatch per run. 6-3 Engine Room: 2, when you start the primary bulkhead.
Weak point The glowing abdominal sac (visible when it rears up to attack or shifts its armour to vent gas) and the 2 glowing sacs on its back (breaking them stuns it and exposes the belly). A direct Rocket Launcher hit kills it. The Stun Rod stuns it instantly; Flash, Acid and Electric Rounds work well.
A cockroach infected with traces of Uroboros, with scythe arms and a caustic spit that blinds you briefly; its shell deflects standard bullets. Its puncture grab is instant death: never fight it up close.
Explosives (Hand Grenades, Explosive Rounds, Proximity Bombs) don't kill it, because it curls up and rolls away, but they drain its health: one or two grenades or one mine often leave it at 1 HP, and any bullet to a weak spot finishes it. Fire does nothing.
- From range: rifle into the belly when it rears up. Up close: shotgun, waiting for it to show the belly.
- Break the 2 sacs on its back and it is stunned with the belly exposed: finish it.
- A grenade or Proximity Bomb first, then one shot into the sac. A direct Rocket Launcher hit kills it (a near miss only makes it roll).
- Shooting off a limb stops the grab, but limbs grow back in seconds.
- 5-2: constant heat kills it too: lead it into the incinerator. Kill it before you go to the 3rd conveyor with the Disposed Bodies.
- 6-3: kill them before the bulkhead finishes opening, or they fight alongside the two Gatling Gun Majini. Acid or Explosive Rounds from the Grenade Launcher work well.
Reward: Power Stone (₦5,000) each: 1 in 5-2, 2 or 3 in 5-3 and 2 in 6-3. Figurine: 5 BSAA Emblems and Chapter 6 cleared.
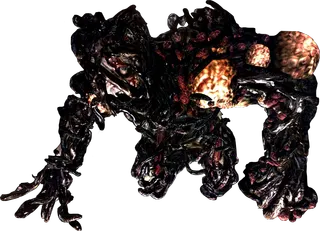
5-2 · Power Station and Missile Area · Uroboros Research Facility: the test chamber with the chair. In the corridor before it, **5 Flame Rounds** and **1 Incendiary Grenade**. In the room, 3 Incendiary Grenades (1 on the monitor table left of the chair, 2 left of the ammo shelf), 3 gas canisters, 2 First Aid Sprays, ammo and the rechargeable **Flamethrower** on the east wall.
Weak point Fire: only when burned does it sprout 3 tentacles with orb tips from its back, its only weak spots. A direct Rocket Launcher hit kills it in one shot, even on Professional.
A test subject who seemed compatible with Uroboros and then went berserk: much bigger and more aggressive than the first one, with two cores. Gunfire alone can't kill it. Burn it and, when the orbs come out, shoot them with your strongest gun before it pulls them back.
Fire sources: Flame Rounds, Incendiary Grenades, the canisters (knock one over, let it absorb it, then shoot) and the Flamethrower, which can be lifted when all 5 charger lights are green and must go back on the wall to refuel. Sources disagree on what works best: use the grenades and fire rounds first and treat the Flamethrower as a free refill.
- Before opening the door, collect the 5 Flame Rounds and the Incendiary Grenade in the corridor.
- Dodge and loot the room while the Flamethrower charges.
- Both players shoot off its limbs until one is left. One takes the Flamethrower; the other shoots off the last limb so it can't hit the flamer.
- Burn it nonstop. When the orbs appear, the other player shoots them with a shotgun, magnum or rifle.
- Put the Flamethrower back on the wall to refuel; the arms grow back. Repeat. IGN: with good aim you won't need more than one refuel.
- Shortcut: one direct Rocket Launcher hit. It costs ₦10,000 in the shop, or farm the free one from the 3-1 boat: pick it up, save and quit, store it, and repeat.
Reward: Nothing. Anything you leave in this room is gone when 5-3 starts.

5-3 · Uroboros Research Facility · Monarch Room: a large hall with two staircases and pillars. The door on the right (east) opens a loop of upstairs corridors with jars, the L. Hawk sarcophagus and treasures.
Weak point Wesker: his back, once he has lost track of you (he says "You can't hide forever" or "Just accept your fate"). 3 shots per opening at most. Jill: the P30 device on her chest; kill Jill and you lose.
Wesker says he only has seven minutes, and the masked Jill fights on his side. There are two routes: survive the 7:00 by dodging (he leaves on his own), or make him flee early by beating him down, which gives the Heart of Africa (₦10,000) and the Bad Blood award. Then comes phase 2: Jill alone, and you must tear the device off her chest.
Wesker dodges every shot he sees coming. You only land hits once he has lost you: break his line of sight, wait at a corner near him, step out, shoot his back with your best gun and run before he warps and rushes you.
- Loot first: run to the door on the right and examine it; after a few seconds Wesker kicks you through it (cutscene). Upstairs: jars, the Sapphire (Oval) and the sarcophagus (your partner opens it) with the L. Hawk, the Emerald (Oval) and the Sapphire (Brilliant); at the far end of the east balcony, the Emerald (Brilliant). Grab it all before Wesker leaves.
- Easy route: dodge, keep away and use the corridors to break his line of sight until 7:00 runs out.
- Heart of Africa route: lure him to the north-west rooms, wait out of sight, shoot his back (3 shots at most: on the 4th he charges you, with a counter prompt) and get away.
- When he staggers, do the combo (Xbox: X, X, B, A, then X+A; PlayStation: Square, Square, Circle, X, then Square+X). One wrong press = an unblockable kick; too slow and he draws his gun (dodgeable, very damaging shot). One source counts about 5 magnum shots in total.
- In co-op, one player baits him while the other shoots his back. A Rocket Launcher from behind the kicked-in door also works if he doesn't dodge; if he catches the rocket, shoot it with a handgun while he holds it.
- If he flees early, the Heart of Africa lies on the floor between the two staircases at the start of phase 2: take it before removing Jill's device.
- Phase 2 (Jill): as Chris, circle her until the "Entreat" prompt appears: the device shocks her and she stops. Grab her from behind and mash; Sheva shoots the device or pulls it off.
- Every gun does the same damage to the device: in co-op use the weakest one, and never magnums, rifles or explosives near her. Hit her body too often and she dies and you lose. "Get the device!" with heavy sparking = the last pull.
- For Masters of Removing: one player holds Jill standing while the other, from the front, tears the device off.
Reward: Heart of Africa (₦10,000) and Bad Blood if Wesker flees before 7:00. Masters of Removing for pulling the device together. The L. Hawk from the sarcophagus is added to the shop. Wesker and Jill (Brainwashed) figurines: 10 BSAA Emblems and Chapter 5 cleared.
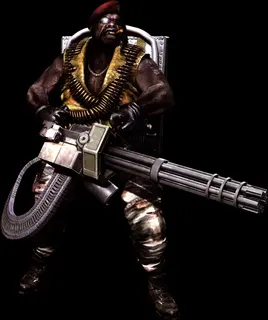
6-1 · The Tanker: Deck and Hold · 6-3 · Hangar and Volcano · 6-1 Ship Hold: 1, as you approach the stairs to the upper level, with catwalks and crates. 6-3 Engine Room: 2, when the primary bulkhead finishes opening, with endless Base Majini and a **Mounted Machine Gun** on a tower to the left.
Weak point Head and upper chest (a rifle or magnum stuns him). The ammo drum on his back is bulletproof: flanking is useless. His melee finishers don't need a partner.
The Base Majini's leader: cigar, beret, gold chain and vest, gold teeth and the rotary gun in his hands. Two looks: a steel gun with sunglasses and beret (may ignore Flash Grenades) and a red gun with a red eye patch and vest. They are the only sub-bosses that drop no treasure: they drop keycards.
Run sideways to dodge most of the stream, which starts weak and builds up to a knockdown or DYING. After he downs someone he fires into the air to taunt: that's your opening (as Chris, a Haymaker from behind). Run far enough and he loses you and stands still. Proximity Bombs are at hand at every one of his appearances.
- 6-1: magnum up close (a leg or head shot, then the strongest finisher), or a rifle from behind the crates while he isn't firing. The gas canisters hit him like a magnum round.
- IGN (6-1): keep moving along the catwalks; line him up against a corner so he shoots the wall, then go for his head.
- Bait his barrel swing, dodge it and punish. His grenade (over 400 damage) can be shot in mid-air.
- Shotgun to the upper body → he blocks → leg melee. Rifle or magnum to the head → stunned → front finisher. Leg damage → kneeling → rear finisher.
- 6-3, before: in the second area kill the 2 Rocket Launcher Majini first. Before opening the primary bulkhead, loot the two small rooms upstairs (First Aid Spray, Proximity Bombs, Nitrogen Rounds, Herb (Red)). Both levers are pulled together, one player each.
- 6-3: starting the bulkhead hatches 2 Reapers that come from behind: kill them before it opens fully.
- 6-3, turret: with the Reapers dead, go to the left edge of the platform next to the bulkhead, take the jump-down prompt, jump to the next platform as soon as it opens and climb the ladder on its left to the Mounted Machine Gun. Open fire as soon as they reach your level: they stay in your arc and only their grenades can reach you.
- 6-3, alternatives: a Rocket Launcher round on the floor between them before they split up kills both. Or thin the small Majini without standing still and snipe their heads from cover. Lay Proximity Bombs around before the bulkhead opens.
- Grab each keycard (or note where it fell) before fighting the other one.
Reward: 6-1: Tanker Keycard A (Tanker Keycard B is in a safe on an isolated platform). 6-3: Hangar Keycard A and Hangar Keycard B, one each. Figurine: 10 BSAA Emblems and Chapter 6 cleared.
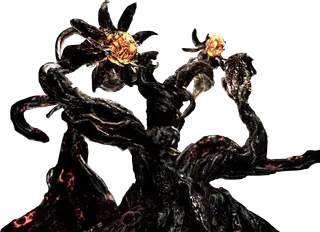
6-2 · The Tanker: Bridge · The ship's Bridge Deck, with a raised platform above the L.T.D. spot (two ladders). On the deck: rifle and handgun ammo, an Incendiary Grenade, a Herb (Red) and 5 Flame Rounds.
Weak point The orange bulbs on the tentacle tips (2 in the first round, 4 in the second; 10,000 damage each, about two shots from an upgraded S&W M500), then the central core. One Rocket Launcher round into the core destroys it; in the story 3 laser hits are enough.
Excella's body rejects the Uroboros Wesker injects into her; she absorbs the pile of Majini corpses on the deck and grows huge. Normal weapons barely touch the body: you break the bulbs to make the core open.
Your big gun is the L.T.D., which guides the satellite laser: aim it like a rifle, keep the red indicator on the target until it locks (about 5 s) and fire; then it recharges (around 1 minute). Sources disagree: IGN says use the laser only; Fandom, which this guide follows, breaks the bulbs with your own guns and saves the laser or a rocket for the core, which is far faster.
- As you enter the deck, turn around: the wall panel with the Tricell logo opens with the Bridge Keycard (the Duvalia in the ship interior carried it). Take the L.T.D.
- Climb a ladder to the raised platform and smash the crates up there.
- Round 1: 2 glowing bulbs. Break them with a magnum or rifle (or the laser, if charged).
- The central core opens: laser, magnum or a Rocket Launcher (one hit on the core kills it).
- Round 2: 4 tentacles with bulbs; same method, then the core again. Tip: break the last bulb with your own gun so the laser is charged for the core; if you are quick you can fire it twice before it dives.
- Follow the dodge prompts when it tries to crush you.
- After hits it spits small Uroboros onto the deck: they are weak and drop ammo, herbs and grenades. While the laser recharges, put it down, kill them and pick it back up.
Reward: Nothing. Figurine: all 30 BSAA Emblems and Chapter 6 cleared.

6-3 · Hangar and Volcano · The bomber hangar: a dark square floor with 4 floodlight consoles, one per corner; the **north-west one is broken**. The **RPG-7 NVS** is in a glass case next to that console; 1 RPG Round lies loose on the ground floor and 5 are in another case on the **upper catwalk** (climb the ladders). The crates by the consoles hold random items.
Weak point His back, from out of his sight and in the dark, or right as he attacks. The rocket he catches: shoot it and it explodes in his hands. The Serum PG67A/W, while he is on his knees.
He dodges every shot he sees, as in 5-3, and most of his attacks kill. Here his own trick brings him down: you fire the RPG-7 NVS at his back, he catches the rocket and you immediately switch to a handgun and shoot the rocket. It explodes, he drops to his knees shouting "Ignorant cretins!", and that is the moment to restrain him and inject the serum.
The first injection always fails: he breaks free and you need at least one more cycle. The bomber QTE follows right after: keep the controller in hand.
- Kill the lights at the north-east, south-east and south-west consoles (the north-west one is broken). In co-op, one player switches one off while the other runs to the next. Left idle, Wesker switches them back on and then tends to use explosives: take cover, or shoot the explosive in his hand to stun him.
- Shoot the glass and take the RPG-7 NVS (night vision). It's a boss weapon: reload it one round at a time with RPG Rounds, which only work here. Your partner can reload you with the partner action.
- Out of his sight, fire at his back. He turns and catches the rocket.
- Switch to a handgun and shoot the rocket in his hands (anywhere on it). Too slow and the fuse dies and he throws it away.
- He kneels: one player restrains him (Chris, mash the prompt) and the other injects the Serum PG67A/W. The first time he breaks free: do it all again.
- If the rocket only stuns him (it happens), do the melee combo: it hurts him, but he can't be restrained.
- Tricks: shoot him exactly as he attacks; 3 hits in a row open a melee chance (a 4th shot gets dodged and countered). When he stands in front of the bomber he throws a missile: blow it up in his hand.
- Bomber: after the hangar comes a cutscene with several QTEs; missing any of them is instant death.
Reward: Nothing. Each Wesker fight adds to his defeated count in Records.
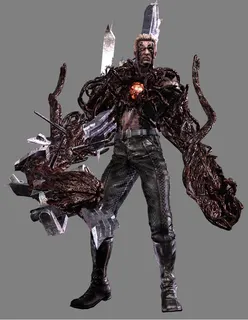
6-3 · Hangar and Volcano · The volcano, by the bomber wreck (items lie near the wreck before you walk on). Phase 1 separated: Chris below, Sheva across the gap. Phase 2 together, on the circular high ground.
Weak point The orange spot on his back (visible when he raises his arm) and, in phase 2, the chest core, which opens after the whirlwind. A Rocket Launcher round on an exposed weak spot kills him.
Weakened by the PG67A/W overdose, Wesker takes the Uroboros himself: tentacles on both arms and metal debris fused to the right one. His arm swing kills on contact or knocks you into the lava.
Phase 1, separated: Chris fights below and pushes a boulder into the lava so Sheva can cross. Phase 2, together: the back → whirlwind → chest cycle. On weapons the sources clash: IGN wants a maxed magnum (about six well-placed shots) and Fandom says magnums do 60% less to him and recommends a rifle or Grenade Launcher. The rifle is the safe middle ground.
- First (Chris only): turn around and run up the slope without crossing the rock bridge; shoot the bottom edge of the off-colour outcrop on the right so it falls into the lava. After your fall, turn left: Diamond (Marquise).
- Phase 1, Chris: go up to the circular high ground. When he raises his arm to slam, dodge with the prompt, flank him and shoot the orange spot on his back.
- Phase 1, Sheva: shoot his back from range to bait him to her side.
- After enough damage he mutates his other arm and jumps to Sheva's side; her bridge collapses and she hangs on (mash). Chris shoots Wesker to keep him off her (about 30 s). If Chris already hurt him before, she climbs up with no mashing.
- Chris runs down around the island to the boulder in the south-east and follows the prompts to push it into the lava. Start only once Sheva is safe, but don't dawdle: if Wesker kills her, you lose. Checkpoint as you head back up to the high ground.
- Phase 2: shoot the back core when he raises his right arm → he flinches into the tentacle whirlwind (instant death up close): get away → the chest core opens: shoot it until it closes. Repeat.
- To keep your distance: 2 handgun shots to the head stagger him back a step or two.
- Finish: when he kneels after a chest hit, Chris restrains him from behind (mash), Sheva stabs the chest and Chris impales his back. Or keep shooting the chest until he dies.
- One-rocket shortcut: right after Chris's fall, when Sheva shouts for you to get to higher ground, run straight up the hill, go left to the farthest point and aim down the slope: he walks up with the orange spot on the back of his left shoulder showing. One rocket ends the fight (only the final QTE is left).
- Final QTE: he grabs the helicopter. When Chris says "Take this, Wesker!" and looks through the scope, press the prompt to fire the two RPGs. Missing it means death.
Reward: The end of the game. The Diamond (Marquise) (₦5,000) is picked up at the start of the fight, as Chris only.
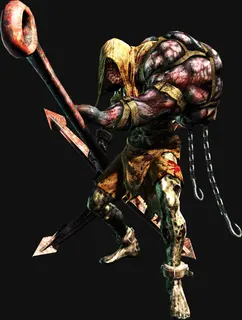
LiN · Lost in Nightmares: The Spencer Estate · Spencer's estate: 2 possible in the mansion (never on a first Amateur or Normal run), several in the underground prison and the ones in the Maze, where you have no weapons.
Weak point The small eye on the hump on its back: one shot always stuns it (it bleeds and spins; keep shooting), and on the easier difficulties one magnum shot kills it. The shoulder tumour takes heavy shotgun damage.
Prisoners from Spencer's cellars infected with an unidentified virus: over 7 ft tall, dragging an anchor. Its anchor hits put you in DYING and its grab has no escape prompt: if your partner doesn't free you in time, the anchor impales you (instant death). It can't run: escaping is easy.
In co-op, pincer it and have one player shoot the eye from behind. In the Maze you have no weapons: you kill it with the spiked-ceiling traps.
- Prison: keep your distance and shoot the eye on the hump; it kneels. Chris: Uppercut / Straight; Jill: Sweep Kick / High Kick. Careful at the top of staircases: it waits there and swings.
- Unbroken barrels sometimes snag it and give you an opening.
- If it grabs someone, the other player has a short window to free them: stay together.
- The Knife works, but it sprays acid. Shooting the growth on its back releases acid blood that stuns anyone nearby.
- Maze: fit the crank of the right colour; your partner turns it and the spiked platform rises. Lure the Blob underneath (not yourself) and press the prompt to drop it. Take the shard from the crushed body.
- Trap and shard: red → Sun Eater Serpent Shard; green → Tri-Head Serpent Shard; violet → Dual-Head Serpent Shard; blue → Serpent Tail Shard. The crank colour in each chest is random.
- If it holds the ceiling up with its anchor (Veteran and up): Flash Grenade or melee it (Jill: Flip Kick; Chris: Haymaker), then get out fast.
- Place each shard as soon as you have it: it updates the checkpoint. Each placed shard releases another Blob, which smashes walls and opens more of the Maze.
Reward: A Blob killed in the prison drops a Score Star. Shards to place in the Maze: Amateur 1, Normal 3, Veteran 4, Professional 4.
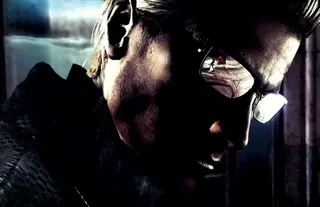
LiN · Lost in Nightmares: The Spencer Estate · The room at the end of the long corridor after you return to the mansion (after the cutscene with Spencer's body). Just before, at the top of the stairs: 2 M92F handguns and a First Aid Spray. Handgun ammo lies around the room.
Weak point He can only be shot in a brief window mid-attack: he dodges bullets even from behind and at a distance. Melee counters after you dodge his dash.
He has his campaign abilities plus new QTE moves. The fight ends after a set time (3 minutes) or once you deal enough damage. You can just dodge it out, but driving him off early gives 3,000 points in Score Stars and the Kung Fu Fighting award.
The method: bait his dash with two handgun shots, dodge it and counter. About 3–4 counters are enough.
- From range, fire 2 handgun shots at him. He usually answers with a short cut-in and a dash.
- Dodge with whatever prompt appears. On Amateur it's always the same one; on Professional you must hit the exact one. If the first strike lands, dodge the follow-up or you may die.
- After a successful dodge, run in and press the melee prompt. If he went for your partner, you get a different prompt.
- A full combo ends the fight at once: Chris, Left Hook → Right Hook → Body Blow → Heavy Blow → Finishing Combo; Jill, Reverse Kick → High Kick → Front Kick → Knee Strike → Double Heel Hop (Xbox: X, X, B, A, X+A; PlayStation: Square, Square, Circle, X, Square+X).
- In co-op: when your partner dodges, don't shoot (it cancels the opening). If you both strike together, both hits count.
- If he knocks you down, rotate the stick to recover. When he attacks your partner, you can save them.
Reward: Kung Fu Fighting and 3,000 points in Score Stars if you drive him off before 3 minutes. If time runs out, no bonus.
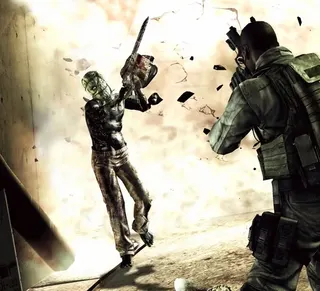
DE · Desperate Escape: Out of the Tricell Facility · Three acts in the Tricell facility: the dock (Transport Area 1 and 2), the turret area (Mounted Launchers and red gates) and the helipad rooftop (timed survival).
Weak point By boss: Chainsaw Majini, leg shot then head; Gatling Gun Majini, grenade or magnum before he spins up; Executioner Majini, one magnum shot anywhere always stuns him; Reaper, grenade or Proximity Bomb, then the open chest.
Each area rolls its enemy set: the town set (Town Majini with Chainsaw Majini and Executioner Majini) or the base set (Base Majini with Gatling Gun Majini, Reapers and the red Executioner Majini, the Executioner's original concept with a flaming axe). The roll repeats in every area. Bosses here have less health than in the other modes: shotguns and machine guns do the job.
All of them except the Reaper swell and explode when they die: shoot them as they fall so the blast can't reach you. Every boss drops a large Score Star (1,000); this DLC has no treasures and no money.
- Act 1, dock: the first boss bursts out of the big container to the north: 2 Chainsaw Majini or a yellow Gatling Gun Majini. It drops the Emergency Exit Key. On top of that container sits a fixed 1,000-point Score Star: shoot it.
- Fall back toward the entrance and blow the oil drums to wipe out the crowd; against the Gatling, hide behind the truck. Lead a Chainsaw through the burning oil to stun him.
- The second boss drops from the walkway above the truck (south): another Chainsaw Majini or a red Gatling Gun Majini (stronger).
- Act 2, turrets: 2 bosses (Executioner Majini or Reaper) that don't appear on Amateur, and a third on the final slope behind the last gate. Any Executioner axe hit puts you in DYING: keep your distance, bait the overhead swing, get behind him and shotgun his back; when he kneels, go for the head.
- Act 3, helipad: survive the timer (it starts at 5:00; at about 0:40 Doug radios and it jumps to about 2:40: roughly 7 minutes in all). Bosses come up the north-east elevator or leap down from the west tower: first a Gatling Gun Majini or a red Executioner Majini, then a Chainsaw Majini or a Reaper.
- Lay Proximity Bombs a little in front of the elevator: they stun bosses. For a blue Chainsaw rising berserk, 2 Hand Grenades as he gets up.
- Kill every boss fast: otherwise the last Agitator Majini (comes up with 26–30 s left, with 2 Big Man Majini) never shows. He turns into a Cephalo: keep a Flash Grenade.
Reward: One large Score Star (1,000) per boss, plus the Emergency Exit Key from the first dock boss. The bosses and the 2 fixed stars add up to 10,000–12,000 points on Normal: just enough for the S rank (10,000 or more).