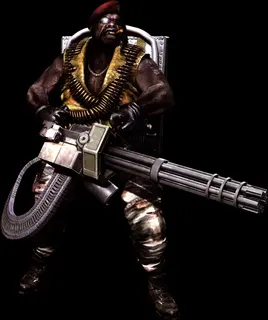
Gatling Gun Majini
- Chapter
- 6-1 · The Tanker: Deck and Hold
- Chapter
- 6-3 · Hangar and Volcano
- Where
- 6-1 Ship Hold: 1, as you approach the stairs to the upper level, with catwalks and crates. 6-3 Engine Room: 2, when the primary bulkhead finishes opening, with endless Base Majini and a **Mounted Machine Gun** on a tower to the left.
Weak point
Head and upper chest (a rifle or magnum stuns him). The ammo drum on his back is bulletproof: flanking is useless. His melee finishers don't need a partner.
The Base Majini's leader: cigar, beret, gold chain and vest, gold teeth and the rotary gun in his hands. Two looks: a steel gun with sunglasses and beret (may ignore Flash Grenades) and a red gun with a red eye patch and vest. They are the only sub-bosses that drop no treasure: they drop keycards.
Run sideways to dodge most of the stream, which starts weak and builds up to a knockdown or DYING. After he downs someone he fires into the air to taunt: that's your opening (as Chris, a Haymaker from behind). Run far enough and he loses you and stands still. Proximity Bombs are at hand at every one of his appearances.
Reward
6-1: Tanker Keycard A (Tanker Keycard B is in a safe on an isolated platform). 6-3: Hangar Keycard A and Hangar Keycard B, one each. Figurine: 10 BSAA Emblems and Chapter 6 cleared.
8,000–14,000 HP (Famitsu guidebook via Fandom). Stream 360–480, barrel swing 320 (knockdown), grenade over 400.
Evil Resource counts 2 in 6-1; Fandom and IGN count 1 (3 in the whole story). This guide follows those three sources: 1 in 6-1 and 2 in 6-3.
Desperate Escape has a yellow one (weaker) and a red one (stronger): see Desperate Escape bosses.
Step by step
- 6-1: magnum up close (a leg or head shot, then the strongest finisher), or a rifle from behind the crates while he isn't firing. The gas canisters hit him like a magnum round.
- IGN (6-1): keep moving along the catwalks; line him up against a corner so he shoots the wall, then go for his head.
- Bait his barrel swing, dodge it and punish. His grenade (over 400 damage) can be shot in mid-air.
- Shotgun to the upper body → he blocks → leg melee. Rifle or magnum to the head → stunned → front finisher. Leg damage → kneeling → rear finisher.
- 6-3, before: in the second area kill the 2 Rocket Launcher Majini first. Before opening the primary bulkhead, loot the two small rooms upstairs (First Aid Spray, Proximity Bombs, Nitrogen Rounds, Herb (Red)). Both levers are pulled together, one player each.
- 6-3: starting the bulkhead hatches 2 Reapers that come from behind: kill them before it opens fully.
- 6-3, turret: with the Reapers dead, go to the left edge of the platform next to the bulkhead, take the jump-down prompt, jump to the next platform as soon as it opens and climb the ladder on its left to the Mounted Machine Gun. Open fire as soon as they reach your level: they stay in your arc and only their grenades can reach you.
- 6-3, alternatives: a Rocket Launcher round on the floor between them before they split up kills both. Or thin the small Majini without standing still and snipe their heads from cover. Lay Proximity Bombs around before the bulkhead opens.
- Grab each keycard (or note where it fell) before fighting the other one.