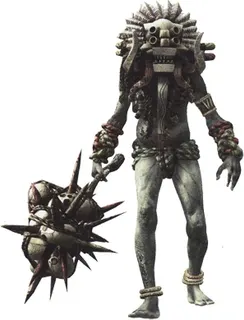
Giant Majini
- Chapter
- 3-1 · Marshlands and Village
- Chapter
- 4-2 · Worship Area and Pyramid
- Where
- 3-1: the Village, 2 in the closing ambush. 4-2: Worship Area, 1 when you take the Sea Emblem (south-west section) and 1 when you take the Sky Emblem (north-west section).
Weak point
The head is completely bulletproof. Shoot the torso, back or legs. One magnum shot makes him kneel. Hand Grenades and Proximity Bombs. Handguns and machine guns barely scratch him.
Ndipaya men grown to almost 3 m by the Type 3 Plaga, swinging spiked maces decorated with skulls. Their war cries call other Majini, and their swings hit those Majini too.
Stay as far away as you can. With a shotgun, rifle or magnum: make him kneel, melee, and back off again. If you are in DYING, his stomp kills you: have your partner revive you before he gets there.
Reward
Blue Enigma (₦3,000) each: 4 in total (2 in 3-1, 2 in 4-2). Figurine: 10 BSAA Emblems and Chapter 4 cleared.
Attacks: club smash (huge damage), kick (low damage, sends you flying), stomp (instant death if you are in DYING), lunge after a war cry (throws back everyone nearby) and a double swing like the Executioner Majini's. There are left- and right-handed versions.
Sheva reaches the Sky Emblem with the assisted jump: Chris covers her with the rifle.
Step by step
- First use the rifle to thin his escort before it closes in (4-2 especially).
- Shoot his legs or torso: one magnum round makes him kneel; otherwise shotgun or rifle.
- Kneeling: arm melee (Hook / Twist Kick). If he blocks with crossed arms and slides back: leg melee (Uppercut / Somersault). Recovering from your hit: the front combo finisher.
- Hand Grenades and Proximity Bombs in his path deal big damage.
- Kill him: if you run, there is no gem. In 4-2 each emblem (Sea Emblem and Sky Emblem) wakes one; take them in any order.