Where each boss shows up, its weak point and how to beat it step by step.

2 · Care Center: Arrival · Care Center, 2F: Prep Room, Nurses' Station, Nurses' Corridor and Room 201. Your refuge is Room 203, where Grace wakes up.
Weak point None in this encounter: Grace has no weapon. Light and silence are your only defence.
Not a fight, an escape. The Girl (the "Shadow Ghost" in some guides) hunts by sound, won't enter lit rooms and moves through holes in the ceiling: falling dust and chains give her away, and she also drops out of vents. She appears at 4 fixed points: the Prep Room after the Lighter, the Nurses' Station when you move the cart, the Nurses' Corridor after the Screwdriver and Room 201 when you take the Fuse.
Careful: she breaks the lights as you progress (first Room 203's, then Room 201's), so safe rooms stop being safe.
- Prep Room (after the Lighter from Room 201): as soon as the cutscene ends, run back to Room 203 with its light on and wait for her to leave.
- Nurses' Station: pushing the cart to the Tool Box makes noise and draws her in. Hide under the small corner table until she leaves, then climb the cart and take the Screwdriver. On Standard (Classic) and Insanity there's an Ink Ribbon in a drawer behind a corpse.
- Hallway to Room 201: she camps it. Go back to Room 203, come out once she breaks the light, and throw an Empty Bottle far away to pull her off the hallway.
- Room 201: open the fuse box with the Screwdriver and take the Fuse. She drops from the ceiling in a cutscene: sprint without stopping to the fuse-less door left of the Horse Statue and insert the Fuse.
- Control switches to Leon. There's no way to stun or kill her in this chapter: don't take risks.
Reward: The open door and the switch to Leon's section.

3 · Care Center: Main Building · 4 · Care Center: Attic · Care Center, West Wing 1F: the Kitchen (first meeting), then his patrol through the SW Corridor, the Kitchen entrance, the West Corridor and the Dining Room.
Weak point His back (a Hemolytic Injector kills him instantly); head and leg shots stagger him.
A huge staff zombie with a cleaver as long as Grace is tall: one hit knocks her down. The staff called him "Mr. Bigshot Chef". He's optional, but he gives the Order Up! trophy (500 CP) and the Pantry Key. As Grace (chapter 3), the cheap, safe method is a Hemolytic Injector from behind. As Leon (chapter 4, only if Grace didn't kill him), stagger him with gunfire and finish him with the Hatchet.
If he chases you, go back to the Central Hall: he loses track of you and moves elsewhere.
- First meeting (Kitchen, stealth): he chops meat while a cart with a stew pot blocks the exit. Push the cart only while he chops (3 to 6 chops). When he mutters "Next... is..." or "Wrong..." he turns to the pot: let go of the cart and hide. About 3 pushes open a gap. Game8 shortcut: let him swing 4 times and run past right after the 4th.
- Patrol: after the Moon Quartz and the Red Jewel he roams the West Wing 1F. If he sees you, run to the Central Hall.
- Grace, injector: craft a Hemolytic Injector (1 Scrap + 60 Infected Blood; the recipe comes from the Blood Lab analyzer). Wait crouched where his route passes by, sneak up behind him and press ZR: instant kill.
- Grace, gunfire: on Casual it takes 1 Requiem headshot + 4-5 pistol headshots; on Standard one Requiem round isn't enough. The S&S M232 alone works, but it takes longer and burns a lot of ammo.
- Leon, read his tell: hands on hips, he raises the cleaver and staggers in with two sets of two-hit swipes with long reach. Back off at that moment.
- Leon, gunfire: shoot his head or legs with the Alligator Snapper (about 15-20 rounds, fewer with headshots). When he staggers, run in and finish him with the Hatchet (ZR at the prompt).
- Don't parry the cleaver unless you're in trouble: it dulls or breaks the Hatchet, like a chainsaw. Afterwards back off and sharpen with L + Y. Use windows, doors and debris to keep him at bay.
- A Hand Grenade also works (about a 2-second fuse: throw it when he stands still). Don't spend the MSBG 500: its shells are for the Blister Heads on 3F.
- Pick up the Pantry Key (as Grace, also 100 blood from the corpse) and open the Pantry from the Kitchen. If Grace opens it, it stays open for Leon.
Reward: Pantry Key → Pantry: Scrap, 12.7x55mm Ammo, 2 buckets of 50 blood, the Stakeout Takeout Charm (Grace: more knife power and durability) and, in the cabinet, the Connoisseur Charm (Leon: more firepower). Order Up! trophy (500 CP).

3 · Care Center: Main Building · Care Center, East Wing 2F: he appears in the Locker Room doorway to the East Stairway as you approach the corpse with the ID Wristband (Level 1), then chases you through the wing's corridors; after that he patrols the long East Wing 1F corridor between the Examination Room, the Blood Lab and the Waiting Room.
Weak point His back (Hemolytic Injector) and his head (Requiem).
Thomas K. Jackson, one of the two Chunk brothers: surgery to suppress his appetite went wrong and now he eats metal and electronics. He's slow, doesn't dodge, charges in a straight line and fills the whole corridor; he gets stuck in narrow doorframes and squashes any zombie in his path. He's optional, but he's the only Chunk Grace can kill: the Grace and Goliath trophy (1,000 CP).
On Standard it takes 3 attacks: Hemolytic Injectors from behind, Requiem rounds or any mix of the two.
- Prepare 3 attacks before approaching the corpse: 3 Hemolytic Injectors (3 Scrap + 180 blood; with 100 capacity, craft them one at a time) or 2 injectors + 1 Requiem round.
- Wait in the doorway of the Examination Room or the Waiting Room until he shuffles past.
- Sneak out crouched behind him and stab the injector (ZR) into his back.
- Duck back into the room, wait for his pattern to reset and repeat, up to 3 times.
- With the Requiem: shoot his head from the Level 2 corridor to the Isolation Ward, where he can't follow. Count on 3 hits on Standard (the wiki says 2, without naming a difficulty).
- Bait: one of the light-switch zombies walks into his path and keeps him busy (IGN).
- On Casual: 1 Requiem headshot + 15-16 S&S M232 headshots, best from a doorway.
- He dies by shrivelling up and exploding: pick up the Eye Spy Charm.
- Last chance: he despawns after Victor's cutscene in the Lead Researcher's Office and returns after you use the ID Wristband (Level 3) on Emily's cell. If you don't kill him then, the trophy is gone for that playthrough.
Reward: Eye Spy Charm (in your inventory, a better chance to survive fatal damage; IGN adds an easier escape from grabs without a bite) and Grace and Goliath (1,000 CP). On later runs, if you already own the charm, he drops 4 Antique Coins.

4 · Care Center: Attic · Care Center Attic (3F), west side: rafters, crates and narrow paths, 2 yellow ladders, a small back room to the northwest and an upper level to the southeast blocked by wooden panelling.
Weak point The head (some guides add the belly and the hands).
Timothy B. Jackson, the brother who turned cannibal: when Leon arrives he's eating a dead guard. The fight is mandatory. The loop never changes: MSBG 500 to the face until he drops to all fours, Hatchet finisher, repeat. About 3 knockdowns with 3 finishers kill him.
Use the doorframes and rafters where he gets stuck, and let him smash the walls before you kill him: there's loot behind them that is lost if he dies first.
- Take the MSBG 500 from the floor next to him and the corpse (first playthrough only).
- Backpedal and shoot him in the face: about 3 shells put him on all fours. Run in and press ZR for the Hatchet finisher to the face (heavy damage).
- Go to the end of the small path on the right and wait: he wedges himself between the beams. Empty an Alligator Snapper magazine into his head while he's stuck.
- Make him charge the wooden panelling near the start: breaking it opens the ladder to the southeast level (Shotgun Shells ×4).
- Climb the yellow ladders to the rafters. When he climbs after you, shoot his head and hands: he falls and a leaping hatchet chop prompt appears (heavy damage).
- Final phase: he thrashes and flops fast along the floor. Lead him down the narrow corridor so he breaks the 2 wall sections (Med Injector to the north, Shotgun Shells ×4 to the northeast), then stun him for the last finisher.
- Once he spews blood from the holes in his body he's finished: stop shooting and wait for the explosion.
Reward: 1 Hand Grenade, which unlocks the grenade recipes (Game8 says 2; Evil Resource, IGN and the wiki say 1). On later runs he's also worth 1,500 credits (wiki).

5 · Care Center: Basement · Care Center Basement: Holding Cells, Boiler Room, Construction Storage, the Ventilation Tunnel grate, sometimes the Workshop and, at the end, the Elevator Passage lift.
Weak point Light and sound. 1 Requiem round stuns her on Casual and Standard; a Molotov Cocktail freezes her briefly; conventional guns only stun her: they can't kill her.
She still can't be killed. Plugging in the power distributors (Joint Plugs) lights rooms, and those rooms become your safe zones. Crouch-walk, keep the flashlight off when she's close, and use Empty Bottles to pull her away.
This is your first good chance at the Bring Out the Big Guns trophy (stun her with the Requiem, 200 CP): in Construction Storage or in the lift.
- Holding Cells (after the first Joint Plug): crouch still in the open cell, flashlight off, until she leaves.
- Service Passage (cutscene): she grabs a crawling zombie. Don't shoot and don't move.
- Boiler Room (after the Square Socket Wrench): keep the central boiler between you and leave on the side opposite to the one she circles. If she spots you, Molotov Cocktail and into a lit room.
- Construction Storage (after its Joint Plug and again after the Forklift Key): wait in the Workshop vent or the side office until she moves away, or stun her with 1 Requiem round (counts for the trophy). After the Forklift Key she can also come out of the Ventilation Tunnel grate.
- Lift: the door is jammed: interact and mash A to clear it.
- Near the top she punches through the roof and grabs Grace. When the lift stops, shoot her: 1 Requiem round stuns her (and counts for the trophy); several pistol shots to the face also make her let go.
- The cable snaps, she falls and loses her arm.
Reward: Getting out of the basement with Emily. Bring Out the Big Guns (200 CP) if you stun her with the Requiem.

7 · Courtyard: Rooftops and Chapel · Care Center Courtyard East: the Cemetery, which Leon covers from the windows while Grace crosses it with Emily, up to the Chapel entrance.
Weak point The red canister by the Chapel entrance: an explosion next to him kills him instantly, even on Insanity.
A second Chef shows up during the escort, whether or not you killed the first one in the Care Center. He comes with the last group of zombies while Leon covers Grace with the rifle. If he reaches Grace, it's game over. Don't waste ammo on him: wait until he walks past the red canister at the Chapel entrance and shoot the canister.
- During the escort, shoot the Zombie Patients closing in on Grace with the Classic 70. Reload only when nobody is near her.
- Locate the red canister by the Chapel entrance and don't set it off early.
- When the Chef walks past it, shoot the canister: instant kill, "even on Insanity" (PowerPyx).
- If you miss, there's a second canister in the southwest of the cemetery, by the steps.

7 · Courtyard: Rooftops and Chapel · The Chapel in Care Center Courtyard East: the nave on 1F and a 2F gallery up a narrow staircase. The chapel catches fire during the fight and the staircase ends up blocked.
Weak point 4 orange cysts: 1 on the back and 3 on the chest and stomach.
A rare mutation of a Blister Head: slow but very durable. It attacks with claw swings, grabs that take a lot of health and a full-speed charge that can't be parried. Pop all 4 cysts and it dies, but every popped cyst releases a red gas cloud that turns nearby zombies, even dead ones, into Blister Heads. On top of that, Zombie Patients keep dropping into the chapel throughout the fight, some with axes.
The key: pop the back cyst first, fight next to the red canisters and kill the Blister Heads before going back to the boss.
- Pop the back cyst first with the Classic 70 from range: once it faces you, you can't see it.
- Go up to the 2F gallery early. The narrow stairs and hallway make the zombies come one at a time. Use it while you can: the fire eventually blocks the staircase.
- Before popping each cyst, stand next to a red canister (one at the top of the 2F stairs, another on the south side of 1F). MSBG 500 on the front cysts; when nearby zombies rise as Blister Heads and rush you, blow the canister among them.
- Combo: shoot a cyst to stagger it, throw the canister at it (A) and shoot the canister.
- Kill the Blister Heads before going back to the boss: stagger each one (head or leg shot, or a thrown axe) and finish it with the Hatchet (ZR); it counts for Chop Chop. Pick up the axes dead zombies drop and throw them (A): they stagger the boss and earn Can I Borrow This?.
- Sidestep as soon as it roars and lunges. Its arm swings can be parried (L), but that throws Leon off balance with no counter window: parry only when cornered.
- When 2F gets crowded, drop to 1F: open the silver case on the north side (Med Injector and Hand Grenade) and use the south canister. Grenades and the Stacked Hand Grenade also stagger it; while it's staggered, kick it (A).
- Last cyst → melee finisher prompt. Press the button and it dies. Clear the stragglers to end the chapter.
Reward: None.

8 · Water Treatment Plant · Water Treatment Plant: Sedimentation, Storage Area, Chemical Treatment and Control Room (1F); the Loading Bay (2F), under the roof hatch.
Weak point Light: floodlights stun her (about 15 seconds, one use each) and sunlight from the roof hatch kills her.
The last encounter with The Girl and the only one where she dies. You have to restart the 3 Power Distribution Units to open the roof hatch while she roams 1F. Your tools: the floodlights, the Molotov Cocktail (freezes her), the Empty Bottle (distracts her) and the Requiem (1 round stuns her on Casual and Standard).
Keep a Requiem round for the Control Room: it's the best spot for Bring Out the Big Guns.
- Roof Hatch Controls: press the switch. The hatch doesn't open, but the 3 units get marked on the map. Go down to 1F.
- Sedimentation: she screeches and roams. At the three-way split she appears ahead: back off or throw an Empty Bottle far away.
- Unit 1, Storage Area (the easiest: do it first). She knocks barrels over and blocks the lever. Switch on the nearby floodlight to stun her, slip past and pull the lever.
- Unit 2, Control Room: its lever is missing. Take the Crank Lever from the shelves of the adjoining Filing Room. She bursts in and throws Grace away from the console: 1 Requiem round (trophy), or lure her into the Filing Room or a lit room, loop back and fit the crank.
- Unit 3, Chemical Treatment: the lever is jammed and needs holding for about 10 seconds. She drops from the ceiling vent as soon as you touch it. Throw the Molotov Cocktail from the metal trolley by the lever to freeze her and hold A. Alternatively, lure her to the floodlight on the other side of the window and loop around to the right.
- Loading Bay (2F): ride the lift back up. She attacks by the hatch: switch on the floodlight aimed at the hatch switch to freeze her and open the Roof Hatch. The sunlight melts her.
- A prompt to shoot appears: finish her with the pistol and keep the Requiem.
Reward: The way to Emily. Bring Out the Big Guns (200 CP) if you stun her with the Requiem.

8 · Water Treatment Plant · Water Treatment Plant: the Storage Bay, seen from the door.
Weak point None: no phases and no weak points.
After the power is back, Emily bleeds out in the Storage Bay. Grace tries CPR and Emily mutates; control switches to Leon at the door. It's a scripted, mandatory moment: shoot her until the cutscene triggers. Her movement is erratic but not fast.
- Keep shooting with the Alligator Snapper until the cutscene. The pistol is enough on any difficulty: save your shells and rifle rounds.
- It can't be avoided: even if you don't shoot, Leon fires at the end.
- No consequence: in the Release Elpis ending Leon says he didn't aim for her vitals, and Emily is rescued and cured.
Reward: None. Afterwards Grace leaves with Victor and Zeno, and the A Harsh Reality trophy pops (escape the care center, 200 CP).

9 · East Raccoon City · A cutscene in the Applegate Hotel Parking, then the NF Building: a chase through the lower floors and an arena on 3F and 4F, with windows, ladders and a big hole in the wall.
Weak point The orange cyst on the rear abdomen (where the damage goes) and the mouth when it faces you (knocks it down). The head and body are armoured.
A giant spider, a B.O.W. left over from Raccoon City. It spits poison, rams, strikes with its front legs, shoots webs and spawns Small Spiders. There's no arachnophobia mode and the fight can't be skipped.
First it chases you and can't be killed: don't waste ammo. In the arena, a shot to the mouth or an explosion knocks it down and exposes the cyst: 4-5 Requiem rounds on the cyst kill it fast (Game8).
- Chase: don't shoot until the objective reads "Defeat the giant spider". The first lunge comes out of the hole beside a doorway: shoot or chop until it pulls back, then climb the fire-escape ladder.
- Watch the big holes in the wall: it grabs you from there. Near a window it can seize Leon and try to drag him out: mash the button on screen.
- Arena: circle it clockwise, climbing the ladders to the upper ledge. It has to slow down and climb after you, which gives you shots at the cyst.
- Explosive canisters: one on 3F (north) and one on 4F (northeast corner); they don't respawn. Don't throw them (it may walk off and the canister blows up alone): lure it next to the canister while you climb a ladder and shoot when it's close. A Hand Grenade also knocks it down.
- Knocked down: 4-5 Requiem rounds on the cyst. Without the Requiem, a point-blank shotgun or the rifle.
- When it hides in the webs, watch its shadow on the walls: it usually drops near the opposite ladder, a good window for the rifle. It comes back through the big hole, over the low walls, from the roof or through the windows.
- Its attacks have long wind-ups: parry (L) if you react in time.
- Spiderlings: if the fight drags on, it summons Small Spiders. Kill them fast with hatchet swipes, the Gal or a grenade: one on your face locks Leon up and you eat the next hit.
Reward: None. The floor gives way, Leon drops into Ridgewood Station and finishes it with the Hatchet to the face.

9 · East Raccoon City · Sewage Facility East (B1): a circular pit with a pipe in the middle and an upper level with steps.
Weak point The orange pustules on its body.
The second Blister Borne, this time as a mini-boss. It stands in the pit surrounded by 4 zombies standing or playing dead (5 on Insanity); 2 more (3 on Insanity) rise after the Valve Handwheel. As in the Chapel, every pustule you pop turns nearby zombies into Blister Heads: clear the regular zombies first.
- Open the valve only 20-25 % and give the pustules a Gal burst through the gap.
- Kill or behead the regular zombies first (stagger, then finish with the Hatchet). Watch for the ones that rise after each pustule.
- Lure it into the circular pit and keep the centre pipe between you to avoid the grabs. Its charge can't be parried.
- Retreat through the wall crack and up to the upper perimeter (crate, Green Herb, second canister). Shoot from above, shotgun anyone climbing the ledge and blow the canister when it charges up the steps.
- Throw the weapons zombies drop to stagger it, then hit it in melee.
- Finish the last pustule with a Requiem round.
Reward: Tracking Module (Rare): 4,200 credits.
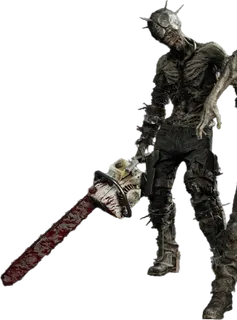
9 · East Raccoon City · The Gas Station (one in the Shop and an armoured one that bursts through the wrecked cars on the west side after the Gas Can) and the upper area of Grimstone's Building 4.
Weak point The face (a shotgun blast makes it drop the chainsaw). The armoured one barely takes headshot damage.
Tougher Raccoon City zombies armed with chainsaws. A single chainsaw hit can kill Leon (he's cut in half). A downed one can still slide towards you with the blade spinning, and a loose chainsaw still spinning on the floor also cuts: wait for it to stop.
There are three: the first gives you its Chainsaw and the second a Tracking Module (Rare).
- The Gas Station Shop one: backpedal while firing, parry (L) the swing (it damages the Hatchet: sharpen afterwards with L + Y) and give it a shotgun blast to the face: it drops the chainsaw. Pick it up.
- The armoured one (spiked helmet; headshots barely hurt it): with the Chainsaw, swing into its swing to clash the chainsaws, land a few hits and step behind it. Without a chainsaw: explosives or the Requiem.
- The Building 4 one: blow the upper canister as it walks by and keep the floor holes between you. Requiem or Stacked Hand Grenade. Never let it reach melee range.
- The Chainsaw kills most zombies in one swing, but it's slow and can get stuck in a body.
Reward: The first one's Chainsaw and a Tracking Module (Rare) worth 5,100 credits from the second.
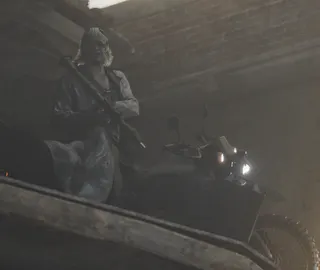
9 · East Raccoon City · Raccoon City's elevated highway and streets, on a motorcycle, after you place the Detonator on the gate.
Weak point Victor: shoot him while the red arrow is over his head to cancel the rocket. Garmrs: any hit; always target the closest one.
An on-rails section: Leon steers himself and you only nudge left and right. You have infinite ammo but must reload (PowerPyx, IGN and a Steam guide say an SMG; Game8 says a handgun). The Garmrs attack one at a time by leaning in on the bike: the closest one is always the next attacker. Running dry when the red arrow appears is the most common way to die.
- Highway: 3 Garmrs. Shoot the closest first and reload between them.
- Victor drops road signs and 2 Garmrs jump onto them: they're stationary, kill them.
- Rooftop detour: the closest Garmr first.
- Back on the highway, Victor rides ahead with an RPG: shoot him while the red arrow is over his head to cancel the rocket. The rocket hits hard, more so with broken armour. This is your first chance at Road Rage (the second time you see Victor on his bike).
- Through a building and up an escalator: a Garmr on the right, one on the left, then two more.
- Alleys: shoot the red gas canisters to break the gates. After the alleys comes your second chance at Road Rage.
- Main street: Victor and 3 Garmrs. Spread your fire and interrupt the RPG.
- Victor drops a building and forces a detour. Then the joust: shoot him as you ride at each other. He goes off a cliff.
Reward: The Road Rage trophy (200 CP) if you stop one of Victor's attacks. If you miss it, reload the autosave.

12 · Side Street and Blackthorn Station · The R.P.D., 1F and 2F: East Hallway, Press Room, East Stairway, Waiting Room, East Hallway 2F, Chief's Office and Private Collection Room.
Weak point None: it can't be killed. Don't spend ammo.
A Connections T-501 guarding Zeno; its trench coat is a bulletproof power limiter. It shows up in the 1F East Hallway after you find Grace and smashes through walls to cut you off. All you do is run the right route.
- East Hallway (1F): it appears after you find Grace. It follows you to the Press Room and the 1F East Stairway, but won't follow you up the stairs.
- When it bursts through a wall, turn back, go through the hole and turn right. If it punches a new hole before you reach the far door, loop around it and use the new one.
- Climb the collapsed staircase (it won't follow), jump the gap, turn left and take the door on the right toward the Waiting Room (2F): the Tyrant rams a helicopter tail through the wall (some guides describe it as a steel beam) and touching it is instant death. Quick-turn and sprint back toward the stairs; when it bursts in, duck into the Chief's Office (on the right per Game8; PCGamesN calls it the side room on the left).
- It breaks through walls again in the 2F East Hallway and the Chief's Office: loop it around the rubble in the middle and go through the hole it made.
- Go past the bear statue in the Private Collection Room and out.
Reward: Getting out of the R.P.D.
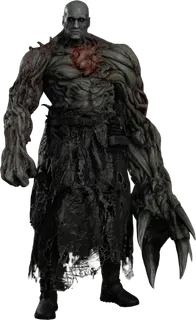
12 · Side Street and Blackthorn Station · The Side Street beside the Basketball Court, past Gun Shop Kendo, full of wrecked cars.
Weak point The exposed heart in its chest, its only weak point.
The T-501 grabs an RPG missile, Leon blows it up and that destroys its power limiter: it becomes the Super Tyrant, with a claw arm and its heart exposed. The fight is mandatory. Use the Requiem without hesitating (the place for the rounds you've saved), then the rifle or shotgun; handguns are a bad trade. Enough heart damage drops it to one knee: 2-3 hatchet strikes to the heart kill it.
Before you start: save at the Side Street Supply Box, upgrade the Hatchet's durability and buy or repair your Body Armor.
- Dragging-claw charge: parry (L) or step aside. It slides past you: shoot its chest as it turns around.
- Parryable: the charge, the mid-range lunging stab, the wide punches and the 3-hit combo (the parry doesn't stun it: retaliate after the third swipe). With an unupgraded Hatchet one parry can use up the edge; Game8 counts about 2 parries per sharpening.
- Not parryable: the leap slam from a car roof and thrown cars. Near a car it can swat it into you: don't stand between it and a car. If it lifts one, move back and left, then sprint across the arena.
- Mid-range: too far and it throws cars; too close and it grabs you.
- Car-top phase: it jumps onto a car and pauses. That's free heart damage; enough of it knocks it off and stuns it. If you fall short, get ready to dodge the leap. Use quiet moments to sharpen (L + Y).
- Stunned → hatchet: when it drops to one knee, run in and use the prompt to hack at the heart (heavy damage). It takes 2 or 3 (IGN: at least two stuns; the second prompt usually ends it). If you're far away, use the stun to heal (R) or reload instead.
Reward: Credits (wiki) and the I Remember That, Too trophy (200 CP).
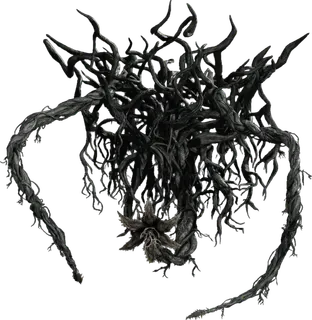
12 · Side Street and Blackthorn Station · Seedlings: Train Carriage 3 (Blackthorn Station, B1) and the Subterranean Passage (B3). Boss: the ARK Service Entrance ledge, with two side tendrils and the central bud.
Weak point Only the central bud when it's fully open. The seedlings when their mouths open; the tendril flowers when they unfurl.
A Connections plant B.O.W. ("Stubborn weed, aren't you?", says Leon). Before the boss, 9 seedlings along the train and the cave give the Not Today, Buds! trophy (500 CP): it's missable, because the cave is one-way. Writhing vines on the floor are grab traps: shoot them to lure the plant out.
The boss has less health than the Super Tyrant: the Requiem isn't needed, nor are grenades. SMG (the best per Game8 and PCGamesN) or shotgun, in short bursts.
- Seedlings: they sway, then open up (vulnerable) and strike fast. A few quick rifle or pistol taps when the mouth opens, or a tight shotgun blast up close. A perfectly timed parry severs them instantly.
- Seedling order: #1 in Train Carriage 3 (unmissable); on B3, #2 near the start (crouch tunnel on the right), #3 and #4 below a dangling car (close range, use the shotgun), #5 on the left side path past the blue tarp (the only one off the main path), #6 in the flooded area with tangled wrecks, #7 directly left of #6, and #8 and #9 at the northeast exit, towards the light.
- ARK Service Entrance: first two large vines rise with flowers at their base. Shoot the flowers as soon as they open, before they slam. Then drop down to the boss ledge (2 crates on the east side, one with a Med Injector).
- Central bud: stay in the middle and shoot it only when it's fully open.
- Side tendrils: one rises and slams straight down onto its side, often both back to back. They can't be parried. Watch which one lifts and step sideways (not backwards, into the bite zone).
- Bud lunge: it closes up and pulls back slightly, then launches and can reach anywhere in the arena. Sidestep.
- Finish: after enough damage it thrashes, vomits and dislodges a truck or container of explosive canisters under or opposite it. Shoot the canisters immediately: the fight ends.
Reward: The way into ARK. Not Today, Buds! (500 CP) if you destroyed all 9 seedlings first.
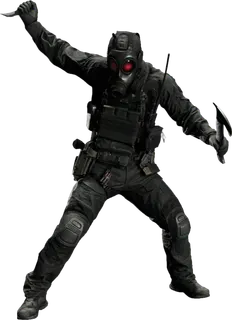
13 · ARK: Arrival · ARK B1: Storage (with a cutscene first in the Guest Corridor, as Leon heads for the eastern door).
Weak point Only the Hatchet after a parry. Bullets don't hurt him (some guides say a quick shot lands when he's stunned).
The Elite Guard's leader: red-lensed gas mask and balaclava. He looks like HUNK, but the game never confirms it. He carries a hatchet, a karambit-style knife and an SMG or pistol.
Guns don't work: Game8 and KeenGamer say they deal no damage even when you see the bullets hit, and drawing a gun lets him close in and bat it aside (IGN). You win with parry (L) + hatchet strikes, only after each parry: if you attack without parrying first, he parries you.
- He chains up to 3 strikes: parry each one at the last moment. After the first scripted clash he attacks twice in a row; the next time, three times. If you attack at the same time as him, the weapons clash, you grapple and everything resets.
- The spinning hatchet strike (alone or inside a combo) has a delayed parry timing. Feints: he fakes right, then slashes up with the knife. Don't parry early.
- A parry can open a melee prompt (a single execution-style hit; no time for anything else).
- Phase 2: after enough damage he throws a flashbang and goes for a neck-snap grab: mash the button on screen or it's instant death.
- He slashes a pipe and fills the room with low steam: he crouches, hits and runs, shoots from cover and throws more flashbangs. When he runs to the opposite corner to shoot, sprint after him: if you catch him, you get free hits. Or wait for him to come to you.
- In first person, aim the camera slightly down: he strikes low (Game8).
- Final stretch: a delayed feint with a spin to the other side and a 3-hit hatchet combo ending in a delayed jump attack. After enough parries and hits, a button sequence ends it.
- Between segments, sharpen the Hatchet (L + Y): a dull edge can't parry. Heal (R) between segments.
Reward: The Mortal Edge: loot it from his body before you leave and equip it. A wider parry window and more base power than the Hatchet (IGN: its maximum power is below a fully upgraded Hatchet).
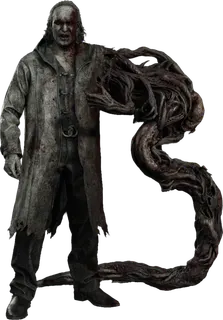
15 · ARK: Finale · The arena below PANDORA, in the Elpis chamber: small and rubble-strewn in phase 1; in phase 2, very little room in front of a flesh mass on the far wall.
Weak point Phase 1: his body, especially right after a parry; the RPG-7 he drops. Phase 2: 3 red pustules (head and shoulders), then 5, and the pustule clusters on the floor.
The final boss, only with the Release Elpis choice. With Destroy Elpis there's no fight. You play as Leon. Two phases: a mutated human with a tentacle arm and a Nemesis form (he carried a Nemesis-type parasite). Every one of his melee attacks can be parried, in both phases. After a parry he steps back a pace: shoot him, no need to counter with the hatchet.
Prepare first: spend every credit (power upgrades, ammo, healing), craft everything, repair your Body Armor, upgrade the Hatchet and bring the Mortal Edge for parries. Bring every Requiem round and at least one Stacked Hand Grenade (PowerPyx spends them on the Repository 11 wave; Game8 and IGN keep them for phase 2).
- Phase 1, melee: single and double swipes, a 3-hit combo, a long-reach thrust, overhead slaps, backhands, lunging stabs, a crouching quick flick and a close-range kick. He side-dashes to dodge gunfire. Parry (L) and shoot.
- After enough damage he kneels: melee prompt. Use the breather to break the arena crates (Rifle Ammo, Med Injectors).
- Electric part: he leaps onto a platform or scrap pile and absorbs ARK's energy. You get about 10 seconds to unload (Game8: the Requiem goes here).
- Then a glowing line runs along the floor towards you with tendrils striking along it: it only travels straight, so run sideways early. Next a circle glows under you and he lands a jump slam with a big AoE: sprint out and punish the landing with the Requiem. It can't be parried. A shoulder charge follows: parry or sidestep.
- The trickiest move (mostly on Insanity): a jump with a tentacle dive-bomb followed by his body, which needs 2 quick parries in a row (VGC). Each cycle gets faster; late on he laughs and flails the tentacle in every direction: many parries in a row.
- RPG-7: he pulls out an RPG-7. Shoot him quickly so he drops it, pick it up (make room in the case) and fire it at him. There's only 1 rocket: don't miss. That ends phase 1.
- Phase 2: pop the 3 red pustules (head and each arm or shoulder) with the SMG (Game8: the fastest) or the rifle; TheGamer does the side ones first. Sidestep back and forth past his single-arm, alternating, two-arm overhead and outward-moving slams, or parry: everything can be parried. He has a grab: stay out of reach.
- With the 3 pustules gone he slumps: a cluster of pustules at his base appears. A Stacked Hand Grenade in the middle of the cluster usually clears it (IGN); otherwise one bullet each.
- Second cycle: 5 pustules on the head and upper arms. Face first; wait for the arms to drop before sniping the arm ones. Another floor cluster: grenade.
- Final grab (scripted): mash to break free and complete the last button sequence. Leon finishes him.
Reward: The good ending and the Hope and Requiem trophy (200 CP).