You play as Chris and Sheva, who finally catch up with Wesker and Excella in the depths of Tricell’s lab. The chapter starts in the room where Mkono died and climbs through the Uroboros complex: Missile Area 2F, a catwalk full of gunmen and Reapers where the H&K PSG-1 waits; the Moving Platform (the same room as the U-8); the Monarch Room Entrance, where the two of you split up and the Licker β come off the walls; and the Monarch Room, with 7 minutes against Wesker and Jill together and then Jill alone with the device on her chest. It’s the chapter with the most treasures you can lose in a run: read the Wesker fight before you go in.
Chapter order: Uroboros Research Facility: emblem 25 behind the fan → office (Sapphire (Marquise), file) → stairs up and partner door → Missile Area 2F: catwalk gunmen → storeroom (Electric Rounds) → gap jump → Reaper → H&K PSG-1 room (generator) → cargo platform: Big Man Majini + Reaper → platform crossing → rocket-launcher Majini → control room (Royal Necklace, file) → Moving Platform: emblem 26, lever Majini → tunnel (Ruby (Brilliant)) → Monarch Room Entrance: emblem 27, generator, lift (one rides), Licker β, blue container, bridge (Chalice (Gold), Topaz (Brilliant)) → Monarch Room: Wesker (7 minutes) → Jill.
Before you start
Saving and shopping. RE5 has no typewriters: the game saves only at checkpoints, and the shop (the Item Management screen) opens every time you start the chapter, pick “Continue” or restart from a checkpoint. 5-3 has three: Missile Area 2F, the Moving Platform and the tunnel at the Monarch Room Entrance.
Shop (the 5-3 Item Management screen).
- New stock: the H&K PSG-1 (₦4,000; added to the shop as soon as you pick it up in Missile Area 2F), the L. Hawk (₦5,000; added when you take it from the sarcophagus in the Monarch Room or, if you skip it, when you finish the chapter) and Electric Rounds for the Grenade Launcher (₦1,200 per pack, per Fandom).
- Upgrades that open at 5-3: M92F capacity 60 (₦5,000) · Ithaca M37 capacity 20 (₦5,000) · M3 firepower 650 (₦8,000) · VZ61 capacity 260 (₦6,000) · AK-74 firepower 200 (₦8,000) · SIG P226 firepower 410 (₦7,000) · S75 firepower 1,500 and capacity 50 (₦15,000) · S&W M500 firepower 4,300 (₦10,000). Each capacity upgrade refills the magazine for free: buy it with the gun empty.
- Buy now: 1 pack of Flash Rounds (₦600) to stun the Reapers and 2 packs of Proximity Bombs (₦3,000) to plant behind you while you push the container with the Lickers on your tail.
- Sell: the 5-2 Reaper’s Power Stone (₦5,000), the Dead Bride’s Necklaces (₦2,000 each) and the Lion Hearts (₦2,500 each). Firearm ammo isn’t sold in the shop: only Proximity Bombs, Grenade Launcher rounds, the First Aid Spray and vests (hand-thrown grenades can’t be bought either).
- Don’t buy Electric Rounds on Amateur, Normal or Veteran: the Missile Area 2F storeroom gives you some for free. On Professional they aren’t there (see below).
What to bring. A machine gun, shotgun, rifle and magnum. The Reapers fall to the Grenade Launcher loaded with Flash Rounds (or the Electric Rounds you find here), and Proximity Bombs handle both them and the Licker container. The magnum is the best weapon against Wesker; for Jill, in co-op, bring your weakest gun (every gun does the same damage to the device, and a miss hits her). If you’re after the Heart of Africa, this is the fight for an upgraded infinite-ammo magnum on a replay.
Difficulty.
- Professional (Fandom’s rules): all fixed ammo and grenades are removed from the stage and crate contents are random; fixed healing items stay. So don’t count on the Electric Rounds in the Missile Area 2F storeroom, the Hand Grenade in the PSG-1 room, the 12 Acid Rounds on the upper walkway (the lift one) or the magnum ammo in the locker: buy Flash Rounds for the Reapers.
- Also on Professional: enemies and crates don’t drop herbs, there are no emergency drops when you’re struggling, you deal 85% damage, Majini melee-weapon hits (the Stun Rod rushers) do 10 times the damage, the DYING window is under 3 seconds and a wrong QTE button is an instant fail (it matters in Wesker’s combo and in Jill’s grabs). Money you find is worth double.
- Reapers: higher difficulties need more belly-and-back cycles. Their grab is instant death on every difficulty.
- Wesker dodges more the higher the difficulty, and on the higher ones his gunshot easily puts you into DYING.
What you can miss this run. 5 treasures and a weapon: the Sapphire (Oval), Emerald (Oval), Sapphire (Brilliant) and the L. Hawk if you don’t take them before Wesker leaves; the Emerald (Brilliant) if you don’t take it before the Jill fight ends; and the Heart of Africa if you don’t make Wesker flee before the 7 minutes are up. The L. Hawk is still added to the shop when you finish the chapter, but the treasures aren’t: if you miss one, replay 5-3 from Chapter Select. Whatever you left in Mkono’s room is gone.
S rank on Normal: accuracy ≥70%, ≥30 kills, 0 deaths and ≤38:00 (A up to 42:00, B up to 48:00). Treasures: 17 (up to about ₦58,500 with the Heart of Africa).
Uroboros Research Facility
You start in Mkono’s room: anything you didn’t pick up in 5-2 is gone. Leave by the right into the corridor.
- BSAA Emblem 25/30 (5-3 #1): in that corridor, just outside the boss room and before you climb the ladder, there are two big wall fans (ahead of you, with your back to the room). The emblem is behind the right-hand one, on the left side of the blades: you see it between them. Wait for the gap and shoot with the handgun.
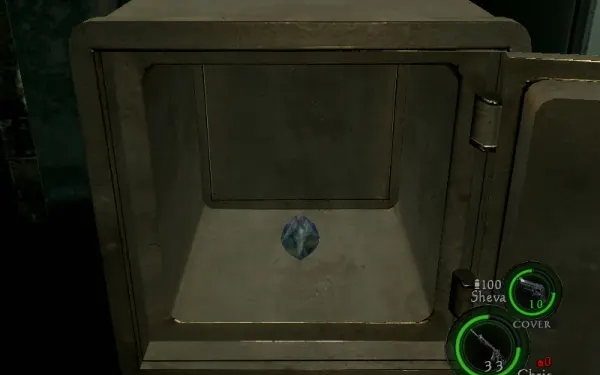
- Climb the ladder and go straight, then left, to the dead-end office overlooking the test chamber (the room Excella watched from). There’s ammo and a safe under the table on the right with the Sapphire (Marquise) (₦3,000; its only location). It’s the easiest ₦3,000 in the game: start 5-3, take it, quit answering “Yes” to save, repeat.
- Directions for Use of Uroboros Virus: in that office, on the shelf under the X-rays. It explains every Uroboros boss: a body that rejects the virus turns into a black mass that must be burned.
Leave the office, go back along the corridor and take the corridor you haven’t explored yet: it leads to a staircase going up. At the top, grab the ammo on the machinery and carry on to the partner door (the two of you open it together). Behind it, the dead end on the right holds 4 crates with valuables and ammo. Then go left along the linear corridor to the Missile Area door.
Missile Area 2F
Checkpoint. The door opens onto a long catwalk with three waves of armed Majini.
- Wave 1: 2 gun-armed Majini. Get behind the wall ahead of you at once, lean out with the rifle and finish them. Then, with your back to the door you came through, go right: 2 crates with items.
- Wave 2, further on: take cover behind the next wall and repeat.
- Storeroom on the left (yellow door): a small room with 5 crates and Electric Rounds for the Grenade Launcher (12 per one guide; Fandom only says “an electric round” can be collected in the room). They stun like the Stun Rod, work against Reapers and stop the Plaga from emerging from Majini. The area also has Gold (Small).
- Wave 3, around the catwalk: the Stun Rod rushers first (they hurt the most), then the gunmen from range. Then jump the gap in the catwalk.
Mini-boss — the catwalk Reapers
There are 4 egg sacs hanging along the catwalk, but each run only 2 or 3 Reapers hatch. The first drops from the ceiling as soon as you turn left after the gap; another shows up in the cargo platform ambush.
- Their attacks: the grab is instant death, however much health you have. It can also spit a caustic substance that blinds you briefly: keep your distance, but don’t stand still in its line of fire.
- Method: back off and let it come down the catwalk, where you have room to retreat. When it rears up it shows the white sac on its belly: shoot it there; it curls up and shows the sacs on its back: shoot those; the belly is exposed again. Belly → back → belly, with more rounds on higher difficulties (the full method is in 5-2).
- Shortcuts: explosives (Hand Grenades, Proximity Bombs) drain its health even when they don’t kill it; Flash and Electric Rounds stun it so you can finish it calmly.
- In co-op: one keeps it busy from the front while the other goes for the sacs on its back.
- Loot: each Reaper drops a Power Stone (₦5,000). Two guides got 2; Fandom says “between one and three” in the chapter.
The H&K PSG-1 room
It’s the door on the left at the square end of the catwalk (east side of the area). Inside:
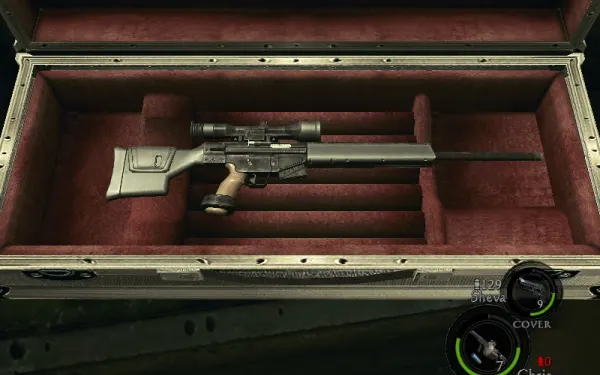
- H&K PSG-1: in a silver weapon case. Rifle: buy ₦4,000 / sell ₦400; firepower 600 up to 1,200, magazine 5 up to 15, reload 2.55 s down to 1.70 s. Its special is the scope: 2 levels of extra zoom (₦3,000 and ₦8,000). It’s the ideal rifle for far-off emblems (number 26, on the Moving Platform, and number 28, on the tanker’s mast in 6-1).
- A Hand Grenade (not on Professional), ammo and a Herb (Red).
- The generator lever that powers the cargo platform. Pull it before you leave.
Cargo platform: the ambush and the crossing
The ambush. On your way back to the platform a Big Man Majini, several gunmen and another Reaper show up. Run, get distance and use the rifle: a powerful one pierces several enemies in a row. Kill the gunmen who have a line on you first and save the Big Man for when he’s close, with a Flash Grenade or a leg shot and the melee finisher.
- Jewel Bangle (₦1,000): the Big Man drops it.
- Power Stone (₦5,000): the Reaper’s. If a third Reaper hatches from the sacs, it drops one too.
The crossing. First clear the enemies on the far side from where you stand. Then one player rides the platform across; on the far side a switch sends it back for the partner (in solo, Sheva rides it on her own). Cover the rider and shoot any enemy who climbs onto the platform. The Majini on that side may burst into Cephalo: Fandom puts 2 shield Majini that turn into Cephalo on that walkway (IGN places them by the rocket-launcher booth). Use a Flash Grenade, or shoot the Plaga when its jaws open. The right-hand catwalk ends in a dead end with items: take them before you go on.
Rocket-launcher Majini and the control room
The rocket-launcher Majini. To the left are 3 Majini with Rocket Launchers: 2 on the catwalk and 1 in the booth. A rocket knocks you down or puts you in DYING: keep moving, use the catwalk’s cover and shoot them while they reload (they’re very slow at it). One wears armour: aim carefully at whatever is exposed or use the magnum. Before entering the booth, shoot inside through its side window.
Control room (observation room). Ammo, a Herb (Green) and two important things:
- Royal Necklace (₦5,000; its only location): on the right, just before the area’s exit door.
- Report on Implementation of Preventing Information Leaks: on the small table by the sofa. It tells what happened to the 5-1 researchers.
Moving Platform
Checkpoint. It’s the same revolving-elevator room where you fought the U-8. The crate on the right holds a Herb (Green), and 2 crates on the walkway hold rifle ammo (you’ll need it).
- BSAA Emblem 26/30 (5-3 #2): before starting the platform, stand on the catwalk on its east side and look up at the balcony-like control booth: the emblem sits on the booth’s grated floor, seen from below. Shoot it with a rifle through the grating. One guide calls it the most annoying of the 30. If you set off without breaking it, restart from this room’s checkpoint and shoot it before you touch the levers.
- The ride up. Both of you pull the levers on the central console together (in solo, Sheva takes the other one): the platform rises as it spins. There are two waves of armed Majini on walkways and booths. In each, a cutscene shows a Majini running into a booth and grabbing a lever that halts the platform: only he has to die (rifle), and the platform moves on. You can ignore the rest: their machine guns are inaccurate at range. Low-recoil weapons help with the rotation. In co-op, have one player watch the booths with the rifle while the other clears whoever climbs aboard.
- At the top more armed Majini wait: stay behind the central column and pick your shots. Collect their drops and follow the catwalk to the door.
Monarch Room Entrance
There’s a checkpoint in the tunnel: if you’re short on First Aid Spray or Grenade Launcher rounds, restart here and buy them in the shop.
- Ruby (Brilliant) (₦2,500; its only location): embedded in the tunnel roof, at the end of the rocky stretch, just before the main chamber. Shoot it and pick it up from the floor.
- The chamber is empty at first. Next to the small lift on the left are 2 crates.
- BSAA Emblem 27/30 (5-3 #3): go round the lift shaft to its back (the side opposite its lever) and look in: the emblem is on the wall, slightly below you. Shoot it with the handgun before using the lift.
- Power for the lift. The lift’s switch reads “Seems like the power’s off.” Go to the raised bridge, turn right and flip the generator lever. Go back to the lift.
The lift: only one rides. This is where you split up. The small building’s door in the chamber reads “It’s locked from the inside,” and the lever that lowers the bridge is inside that building: whoever rides up has to reach it from above.
- The one who rides up follows the upper walkway: 12 Acid Rounds (absent on Professional), rifle ammo and random items. At the end they push the blue container (see below) and open the building’s door from inside.
- The one who stays below waits in the chamber for the partner to open the door and defends them: while the other pushes the container, pick the Licker β off the walls with the rifle before they reach the walkway.
- Who rides. One guide suggests Chris goes up while Sheva stays below with the rifle. In solo you can also stay below yourself: the AI rides up on its own and you snipe from the chamber. In split screen, send up the player with the better close-range gun (shotgun or magnum) and keep the rifle below.
The Licker β waves. First 2, then 3 (shoot them before they come off the walls) and finally over 10 that climb out of a hole in the wall and spot you at once. Remember they only leave their drop if they die on the ground:
- Lion Heart ×3 (₦2,500 each, random): two guides got 3 here.
- A good spot for Heart Stopper: knock one onto its back and stab its heart with the melee prompt.
The blue container. On the upper walkway, push the blue container (hold the button) while the Lickers follow you: drop a Proximity Bomb every few steps behind you. The container crashes through the roof of the small building; clear the Lickers in the line before you go in. There’s a Herb (Green) on the roof. Drop inside: the lockers hold the Chalice (Gold) (₦3,000), a First Aid Spray and magnum ammo (absent on Professional). Unlock the door to let your partner in and pull the lever that lowers the bridge.
- Topaz (Brilliant) (₦2,500; its only location): cross the bridge and look up: it’s embedded in the rock above the far door.
Monarch Room
Cutscene: Excella, the hooded figure (Jill) and Wesker, who offers a two-on-two and says he only has seven minutes. The room has two staircases up to balconies, a door on the right (east) on the ground floor, rooms to the north-west and an east balcony. A Herb (Green) and a Herb (Red) flank the spot where the Heart of Africa appears, and there are jars with random items: break them.
Boss — Albert Wesker (7 minutes)
Rules: if Jill dies, the mission fails (partner-died message): never shoot her. During this phase Jill also fires SMG bursts (with dodge prompts); together you can knock her down, and she takes about 2 minutes to get up. In solo, one guide suggests leaving Sheva with no firearm, or only the Stun Rod, so she handles Jill without overdoing the damage.
Loot first (before Wesker leaves). All of this is lost for the run once Wesker goes (at 7 minutes, or sooner if you make him flee):
- Don’t shoot him at the start: run to the door on the right (east) and examine it. After a few seconds Wesker kicks you through it (cutscene), opening a loop of upstairs corridors.
- Sapphire (Oval) (₦2,000): follow the corridor and climb the stairs to an open doorway: it’s in a pot on the right in the north-west room.
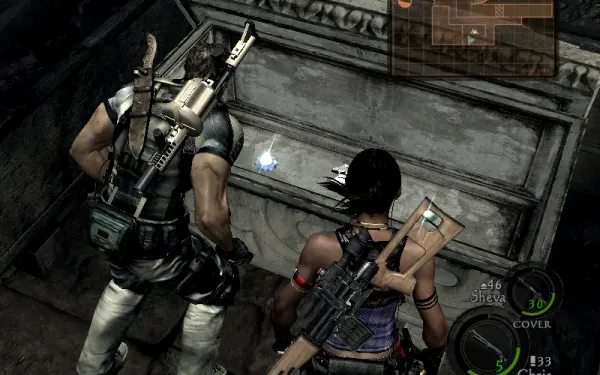
- The stone sarcophagus in the next room (west, upstairs) opens with a partner action: your partner must be with you (in solo, wait for Sheva to catch up). Inside: the L. Hawk magnum, the Emerald (Oval) (₦2,000) and the Sapphire (Brilliant) (₦2,500).
- Emerald (Brilliant) (₦2,500): in a vase at the far end of the east balcony, next to a Tricell container (up the right-hand staircase to the end). Sources disagree on whether it vanishes with Wesker or stays through the Jill fight: take it now.
The L. Hawk is a magnum: buy ₦5,000 / sell ₦500; firepower 1,400 up to 3,000, magazine 5 up to 8, piercing 3 up to 7, reload 1.70 s down to 1.36 s. It’s the weakest magnum (3,000 fully upgraded against the S&W M29’s 3,200), but it pierces the most, kicks the least, reloads the fastest and is the cheapest to upgrade; Evil Resource gives it the edge over the M29 when both are maxed. If you’ve already upgraded your first magnum, there’s no need to switch. If you skip it, it’s added to the shop when you finish the chapter.
Route A: survive 7 minutes. Dodge, stay far away and use the corridors to break his line of sight: when he loses sight of you, Wesker walks slowly and his clock runs down. When time runs out he leaves on his own and the Jill phase begins. You get neither the Heart of Africa nor the achievement.
Route B: make him flee early (Heart of Africa and the Bad Blood achievement).
- Break line of sight. Wesker dodges any shot he sees coming (and dodges more on higher difficulties). You only hit him once he’s lost track of you: you know because he says “You can’t hide forever” or “Just accept your fate”. If he turns toward your partner, shoot him in the back.
- Hit him from behind. Lure him to the north-west rooms, wait at a corner near him, pop out and shoot him in the back with your best weapon, then run before he warps and rush-attacks.
- 3 shots per opening, max. On the 4th he charges: a counter prompt appears. After the counter, shoot him as he gets up so he staggers and opens the combo again. One guide: sneak up behind, 3 magnum shots, he charges, repeat.
- The melee combo. When he staggers, move in and follow the on-screen prompts one by one. The usual sequence is Xbox: X, X, B, A, then X+A; PlayStation: Square, Square, Circle, X, then Square+X; but watch each prompt instead of memorising it: one wrong press = a kick you can’t dodge. Too slow and Wesker draws his gun (the shot can be dodged, but it hurts a lot and puts you into DYING on higher difficulties). One guide counts about 5 magnum rounds in total: 2 shots, beat-down, repeat, and the last shot drops him to one knee and he flees.
- The rocket trick. The Rocket Launcher works if he doesn’t see it coming (for example, from behind the door he kicked you through: go round the upstairs corridors and you come out at his back). If he catches the rocket, switch at once to another gun (not a shotgun) and shoot the rocket in his hand. In co-op, split up: one baits, the other fires. Only the player who deals the damage gets the achievement.
- Reward: Wesker flees and, as the Jill phase starts, the Heart of Africa (₦10,000, tied with the Soul Gem as the priciest treasure and needed for They Belong in a Museum) lies on the floor between the two staircases. Pick it up before you tear the device off Jill.
Boss — Jill Valentine
Jill wears the P30 device that controls her on her chest. The goal is to tear it off, not to kill her: if she dies, the mission fails.
Her attacks: she backflips to the middle of the room and fires two SMGs in a circle (no dodge prompt: hide behind a pillar or circle in close to her); she runs, leaps and perches on pillars to shoot from above (stand under her or behind another pillar); she jumps on you and suplexes you (heavy damage: get out of the way); and she trips you. When she breaks free of a hold, her counter-attacks come with dodge prompts; on Professional, a wrong button is an instant fail.
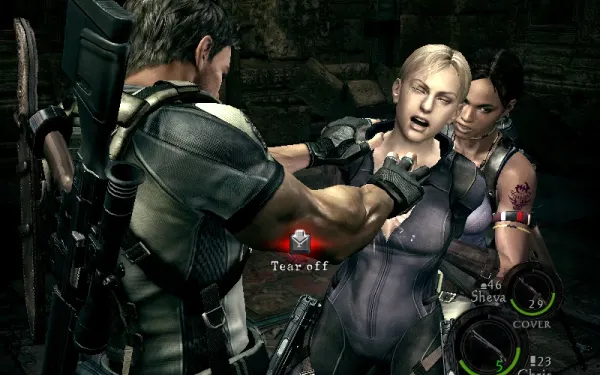
- Restrain her. Get behind her and grab her (mash the prompt). As Chris, circle her until the “Entreat” option appears (talking to her): the device shocks her, she clutches her head and stands still, and that’s the best moment to grab her.
- Remove the device. While one holds her, the other pulls the device (partner action) or shoots it. Every gun does the same damage to the device, but a miss hits Jill: in co-op, the weakest gun, and never a magnum, rifle or explosives near her. Shooting it, then pulling, is fastest. With the AI: you hold her and Sheva shoots the device without missing.
- Repeat. It takes at least 3 attempts. If you hear “We have to get that device off her chest!”, more are needed; if you hear “Get the device!” and it sparks heavily, this is the final pull.
- Masters of Removing achievement: one player grabs Jill standing, from behind (easiest while she’s clutching her head after “Entreat”) and holds through the QTEs, and the other, in front of her, rips the device off. Knocking her down and tearing it off while sitting on her doesn’t count. In co-op both players get it, and it works with the AI playing one of the roles. Expect 7–8 pulls or more. If the final pull happens with her on the floor, there’s no achievement and you’ll have to replay 5-3.
- Reward: a cutscene where Jill stays behind and tells them to stop Wesker. Completed Chapter 5-3 achievement and the Jill Valentine Library file. With chapter 5 cleared, Bonus Features unlocks the Majini (Base A) and Majini (Base B) figurines; with 5 emblems, the Licker β; with 10, Jill (Brainwashed), Wesker, Excella, Uroboros and U-8 (500 points each).
Before you leave you should have: the H&K PSG-1 (with the upgraded scope if you can: 6-1’s emblem 28 looks tiny), a shotgun and magnum with ammo, a Hand Grenade or two or the Grenade Launcher (emblem 29 only breaks to explosives) and healing. In the 6-1 shop: sell the 5-3 treasures (the Heart of Africa, the Royal Necklace and the Power Stones are worth the most).
Don’t leave without: BSAA Emblem 25 behind the fan, 26 under the booth (before starting the platform) and 27 in the lift shaft · the Sapphire (Marquise) in the safe · the files Directions for Use of Uroboros Virus (shelf under the X-rays in the office) and Report on Implementation of Preventing Information Leaks (small table by the control room sofa) · the H&K PSG-1 · the Reapers’ Power Stones and the Big Man’s Jewel Bangle · the Royal Necklace in the control room · the Ruby (Brilliant) in the tunnel roof · the Lickers’ Lion Hearts · the locker’s Chalice (Gold) and the Topaz (Brilliant) above the door · and, before Wesker leaves, the Sapphire (Oval), the sarcophagus (L. Hawk, Emerald (Oval), Sapphire (Brilliant)) and the Emerald (Brilliant) · the Heart of Africa if you made him flee.