You play as Chris Redfield, now working for the new Umbrella, right after the end of the campaign. Lucas Baker is still hiding in the salt mines under the farm, with three of Chris’s soldiers as bait and Eveline’s data about to be sold. The episode revolves around one hub, the Central Cavern, and its three coloured shutters, which open in order: the red one gives the air filter, the green one the night-vision visor and the blue one the Clown Key. Then come a 10-minute race with a bomb on your arm, the Mama Mold fight, the assault on the Shield Machine and the lab where Mutated Lucas waits. There is no crafting and no shop: everything you use is placed on the map.
Chapter order: Abandoned Mine (the teammate ambush) → Central Cavern (tape recorder, item box, birdcages) → red shutter: Mining Work Area, Gear + Crank → Cell Key → the Cell: High-Grade Filter → green shutter: Storage Area → Backup Power Room: Night Vision Device and the first RAMRODs → Sewage (switches up-down-up) → back past the turrets → blue shutter: Mine Cart Yard, laser traps, mine carts → Repair Yard: Clown Key → Ventilation Room: 10-minute bomb → race back to the Mining Work Area → Dead End (free Steroids) → Mama Mold → liquid nitrogen → Store Room West (free Stabilizer) → Shield Machine (point of no return, three waves) → Research Facility → Clinical Lab (last tape recorder) → Mutated Lucas.
Prepare: you play as Chris Redfield, with 16 slots and no crafting. There are only two tape recorders in the whole episode (Central Cavern and Clinical Lab, each with an item box); everything else is autosaves. On Easy and Normal you start with the Samurai Edge - AW Model-01 (handgun), the Thor’s Hammer - AW Model-02 (semi-auto shotgun, 12 shells, takes 2 slots), the Tactical Knife, 3 Grenade, 18 rounds of Handgun Ammo, 12 of Shotgun Ammo and 1 Med Injector (3 on Easy). The Briefing Document and the Letter Regarding Umbrella’s Goals are already in your inventory (per the guides): put them in the box. Against a Molded: head shot → punch → stomp, with almost no ammo spent. Guarding (L) just before a hit is a deflect that stuns the enemy and sets up the punch. The helmet tracks oxygen, which drains in contaminated air until you have the High-Grade Filter. White mold rule: Fumers (white Molded) and the Mama Mold take no damage until a RAMROD hits them (the handgun’s Anti-Regen Ammo; to load it, hold ZL (aim) and press X; do it again to switch back). Normal has 34 RAMRODs in total and none before the Backup Power Room: until then, avoid Fumers. Keep about a dozen RAMRODs for Lucas (roughly 5-6 per phase).
Shop: there is no merchant. The two birdcages in the Central Cavern trade Antique Coins for upgrades: Steroids for 3 (more health) and Stabilizer for 5 (faster reloads). There is also a free Steroids in the Dead End and a free Stabilizer in Store Room West.
Point of no return: using the Clown Key on the Central Cavern console and entering the Shield Machine cuts you off from the mines: after the self-destruct you crawl out into the Research Facility cavern and no guide describes a way back, so treat it as a point of no return. Before you touch the console, have all 10 Antique Coins (the Fast Walk reward needs all 10 plus a clear), both birdcages bought, the Steroids from the Dead End, the Stabilizer from Store Room West and the Mine Cart Yard Passage container opened with the S1 Lock Pick (RAMROD ×2). Then save.
Abandoned Mine: the way in and the ambush
Entrance, Cavern and Winding Tunnel. The first three tunnels are linear and hold no items or enemies on Normal: follow the only way out to the junction.
Crossroads. 2 Molded wander here and, as you head for the west exit, 2 more arrive: one drops from the ceiling, one comes out of the west passage. This is the place to practise the head shot → punch → stomp cycle and the L deflect: spend one or two bullets per Molded, no more. Carry on west through the Mine Cart Tunnel to the North Cavern.
North Cavern (the large chamber with stairs). Grenade on top of the barrels in the southeast corner. Climb the stairs to the Cultivation Room door.
Cultivation Room (the ambush). You find a fallen teammate: it is a trap. Lucas, posing as another soldier, straps a bomb to your arm and sets off another on the hostage’s neck. Your bomb has no timer yet: Lucas arms its 10-minute countdown much later, in the Ventilation Room. The room floods with chemicals and your air is limited: run through to the Storage Space and the Office, where a Med Injector sits on the desk.
South Cavern Walkway, Passage and Elevator Hall. The air is still contaminated: do not stop to explore. The Elevator Hall has 1 Molded; kill it and press the red button. The contamination stops as soon as the lift starts down.
Central Cavern (safe room and the episode’s hub)
Tape recorder on the table in front of the shield machine (west side) and an item box in front of it. Save. Three coloured shutters open from here and the order is forced: the red one gives the filter you need behind the green one, and the green one gives the visor you need behind the blue one. The console by the tape recorder is the Shield Machine’s: do not use it until the end (see “Point of no return”). Collect everything:
- Antique Coin (#1) on a barrel to the left of the large green shipping container, northeast area: as you enter, on the right, in the alcove between the rock and the container.
- Handgun Ammo ×4 on the barrel to the right of the same container.
- Shotgun Ammo ×2 on a large white sack, northeast area.
- Handgun Ammo ×4 on a barrel in the middle.
- Grenade on a large white sack on the southwest platform, by the birdcages.
The two birdcages (the episode’s “shop”) are on that southwest platform, up the steps: Steroids for 3 coins and Stabilizer for 5. 10 coins buy both with 2 to spare. Buy the Steroids as soon as you have 3 (when you come back from the red shutter). Before you head out, drop the two starting files in the box.
Red shutter: Mining Work Area
Entrance. The locked Cell is on your left: you will come back with the key. Handgun Ammo ×3 among the rocks on the southeast side, near the shutter. Antique Coin (#2) on the rock ledge behind the barrel, opposite the Cell. Take the lift to the Work Sector Entry (2F) and go right to Work Sector A.
Work Sector A (the cavern with a container hanging from a crane). When you enter the central area, 9 Molded come out (12 on Easy) and, once most of them are down, a Crawler Molded; one more comes out of the northeast offshoot as you approach it. Hold a corridor: back off towards the lift so they arrive one at a time and use handgun → punch → stomp on the slow ones; keep the shotgun for the Crawlers, which leap and slash. Before you touch the winch, pick up everything:
- Antique Coin (#3) on the side of the large white sack by the south wall: out of the lift, follow the tracks to the right.
- Med Injector on a barrel on the west side; Strong Med Injector in the breakable crate on the west side (Med Injector on Easy).
- 2 Neuro-stun Grenade on a barrel on the east side.
- Handgun Ammo ×3 on the edge of the mine cart (southeast) and Handgun Ammo ×3 on the barrels on the north side.
- Grenade on the barrel at the end of the northeast offshoot.
The Cell Key puzzle. The key is inside the hanging container:
- Gear: on the rocks at the end of the northeast offshoot (behind the mine cart).
- Crank: on the large wooden spindle on the east side of the central area.
- At the winch mechanism on the north side (by the clown door) fit the Gear first, then the Crank, and turn it. The container comes down: take the Cell Key.
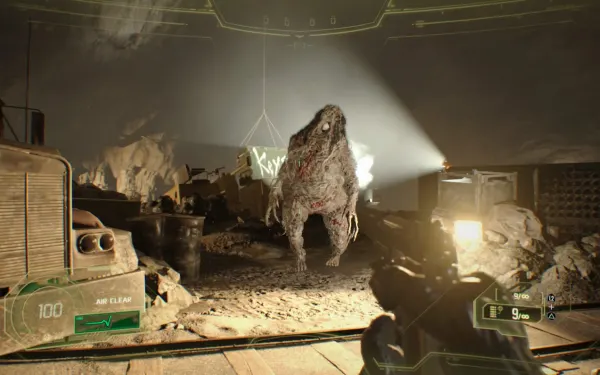
When you turn the crank the Mama Mold (the big white Molded) shows up. It is immortal here: do not waste bullets on it. Throw a Grenade to stun it while you turn, grab the key and head back to the lift. The clown door on the north side does not open yet: it needs the Clown Key, and you will go through it during the bomb race.
The Cell. Ride the lift down to the Entrance and open the Cell with the Cell Key. Lucas’s trap goes off and your teammate is decapitated. Take the High-Grade Filter from his head: it fits itself to your helmet and lets you breathe in spore-filled areas (most of the Storage Area). Head back to the Central Cavern and buy the Steroids if you have 3 coins.
Green shutter: Storage Area (first pass)
The catacombs form a ring of lettered sections (W, C, E, N, S), and the in-game map uses the same names. On this first pass you go west to east through the middle:
- Entrance → Passage. In the Passage, on the left, there is a clown door: it leads to Store Room West and stays locked until you have the Clown Key. Keep going.
- Section (W1). Empty for now. Go on to C1.
- Section (C1). A Fumer appears at the east end as soon as you enter. You have no RAMRODs yet, so take the Grenade from the shelves on the northwest wall, throw it and run past it.
- Section (C2). A clear run through to C3.
- Section (C3) (the corner with carts and boxes): Antique Coin (#4) on the pile of small white bags in the northeast corner and 2 Neuro-stun Grenade on the large wooden crate in the same corner. A Fumer comes out in the south area as you approach: do not fight, keep heading east.
- Section (E1) and Section (E2). In E2 another Fumer appears on the south side: dodge it and go through the open metal door on the right.
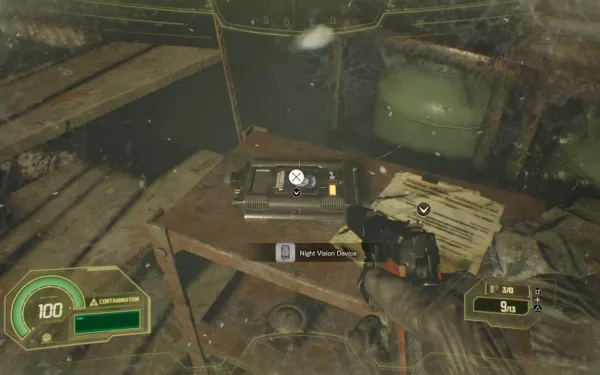
Backup Power Room. On the metal shelves in the northeast corner: the Night Vision Device (it switches on by itself in the dark), the file Night Vision Device Manual, the file Anti-Regen Ammo - RAMRODs - Guide, RAMROD ×3 and a Med Injector. On the large wooden spindle in the southwest corner, 2 Incendiary Grenade; on the caged water container on the south side, Shotgun Ammo ×6. From now on one RAMROD to the chest kills a Fumer on Normal. Taking the visor switches on new gun turrets in the Storage Area: you will meet them on the way back.
Store Room East. Go back to E2 and through the north door, which only opens with the Night Vision Device. Inside: Incendiary Grenade on the mound of white mold by the door and a Med Injector in the crate. An alarm goes off: step into the pitch darkness, break the barrels in the next room with the knife and drop through the hole in the floor.
Sewage: the three switches
The lift has no power. The hint is on the wall by the dead lift, to the north, and the three switches are in the northeast corner. The code is the same on every difficulty: left UP, middle DOWN, right UP.
With the power on come endless Little Crawlers: they leap once and burst whether they hit or not. How to hold out until the lift arrives:
- Before you flip the last switch, put the Incendiary Grenades on your quick slots.
- Call the lift and turn around: throw an incendiary into the advancing Crawlers and a second one to keep them back until the doors open. The knife or a Neuro-stun Grenade also works if you are short.
- Stand with your back to the lift and walk backwards: you step in as soon as it opens while still facing the leapers, guarding (L) as they jump.
Sections (N3), (N2) and (N1)
Section (N3). 1 Little Crawler and the Antique Coin (#5) on the barrel at the south end, at the end of the first corridor out of the lift (on Easy there are also RAMROD ×3 on the pallet; not on Normal).
Section (N2). A Fumer waits in the southwest corner: the first one worth killing, with one RAMROD to the chest. The east passage has 2 gun turrets: crouch to pass under their line of fire and let them shred the Molded chasing you. Med Injector on the south shelves (southeast) and Shotgun Ammo ×4 on the lower shelves on the north side.
Section (N1). 2 Molded wander and another one appears when you unlock the door to C1. Kill them before you open the gate: the way back starts behind it.
Back through the Storage Area: turrets and Molded
With the visor in hand the sections have changed: 3 turrets in the northeast corner of W1, 1 in C2 and 3 in the northeast corner of E1. The way back to the Central Cavern is C1 → C2 → C3 → S2 → S1 → W1 → Passage → Entrance:
- Section (C1). Through the gate, turn right: 4 Molded rise from the ground on the west side. Towards W1 the three turrets block your path: go left instead, towards C2, and fight the Molded that follow you there.
- Section (C2). The corridor turret takes aim: crouch and move under its line of fire.
- Section (C3). 5 Molded appear in its east passage. Let the C2 turret shoot the ones chasing you and punch and stomp the ones that reach you. Then take the door to S2.
- Section (S2). A Fat Headless Molded comes from the west: it runs at you and explodes on contact or when it dies. One shotgun shell kills it; shoot it from range and back away. Handgun Ammo ×16 on the barrel in the southeast corner.
- Section (S1). A Fumer at the north end (RAMROD to the chest) and 10 Molded that spawn as you explore: use the red barrel to blow up two at once. In the crates of the southwest passage, Shotgun Ammo ×6 and Handgun Ammo ×6; Neuro-stun Grenade on the south shelves. At the end of the southwest passage (past the crates): Antique Coin (#6) on the large white sack and the Lock Pick on the small paint bucket next to it.
- Section (W1) → Passage → Entrance. Leave S1 through the now-open gate. The W1 turrets sit in its northeast corner: if they take aim, crouch and keep going to the Passage. Head back to the Central Cavern and save.
Blue shutter: Mine Cart Yard
Passage. It is dark and full of laser tripwires and black pressure plates that only the Night Vision Device shows. Before you cross the lasers, clear the two branches:
- Northwest branch (the first right): Antique Coin (#7) on the small paint bucket, to the right of two crates, and Handgun Ammo ×6 and Shotgun Ammo ×6 in the breakable crates.
- Northeast branch: at the end, the locked container opens with the Lock Pick from S1: RAMROD ×2.
Then crouch under the first laser, slip between the next two and, before the door, crouch under the regular tripwire. Press the button by the door to open the shutter.
Departure Yard: the first cart. On the tracks, equip the shotgun before you push the cart: it smashes a wooden barrier and a Fat Headless Molded appears from the northern passage. Shoot it from range (one shell does it) and back off so the blast does not reach you.
Holding Yard: the mine cart puzzle. As you enter the Holding Yard, on the right, there is a lit wooden barrier: you have to smash it with a pushed cart.
- Push the cart near the entrance hall.
- Push the southeast cart into the southwest corner.
- Push the yellow cart that blocks the way: it hits the cart you moved earlier, so it does not call more enemies.
- Finally push the balloon cart: it breaks the barrier.
Once it breaks, a second Fat Headless Molded comes out of the southern area. Same as before: shotgun in hand, fire from range and back off. In the Holding Yard, Med Injector inside the mine cart in the southeast corner. Carry on through the Corridor.
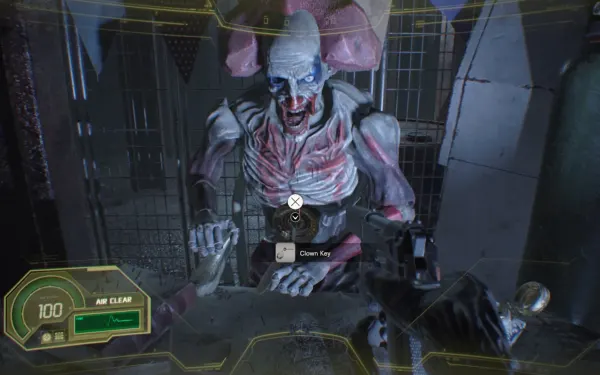
Repair Yard (the clown room). The Clown Key is on the mechanical clown in the middle. Before you take it, collect the Antique Coin (#8) between the stacked caged containers in the southwest corner, left of the clown, plus Shotgun Ammo ×6 and a Med Injector on the metal shelves in the northeast corner. Taking the key spawns 3 Crawler Molded (1 in the southeast, 2 in the northwest) and a Fumer in the southeast. If you reach the door, the Crawlers do not follow. 1 more Crawler Molded appears in the Corridor.
What the Clown Key opens: the Mine Cart Yard Corridor door to the Back Passage (the next one), the Work Sector A clown door to the Passage (you use it during the bomb), the Storage Area Passage door to Store Room West (free Stabilizer) and the Central Cavern console that opens the Shield Machine (the last one, with no way back).
Ventilation Room: the 10-minute bomb
Back Passage and Back Corridor. Go through the Corridor’s clown door. Laser tripwires: crouch and slip between them as in the Passage.
Ventilation Room. Walk past the tied-up soldier (Marquez) and flip the power switch on the west side first to kill the lasers. Before you help him, take everything, because the clock starts afterwards: Shotgun Ammo ×6 on the shelves on the east side and, in the crates by the switch, RAMROD ×3 and Shotgun Ammo ×6. Equip the shotgun and grenades, then help him: Lucas kills him and arms the bomb strapped to your arm since the Cultivation Room: 10 minutes.
Maintenance Passage. The ladder room: Antique Coin (#9) inside the open cardboard box at the foot of the ladder, in the left corner. Grab it without stopping and climb: you come out in the Departure Yard.
Against the clock: back to the Mining Work Area
Route: Departure Yard → Passage → Central Cavern → red shutter → Entrance → lift → Work Sector A → clown door → Passage → Intersection → Work Sector B. New enemies line the way:
- Mine Cart Yard Passage: 3 Molded and 1 Fat Headless Molded. Carry the shotgun from the Departure Yard and shoot the fat one as soon as you see it.
- Mining Work Area Entrance: 2 Molded before the lift. Run past or blast them.
- Work Sector A: 2 Crawler Molded and 2 Fumers. Do not fight: follow the tracks to the right, which ramp down the right edge of the room and avoid the Molded, then go up to the left to the painted clown door. A Neuro-stun or an Incendiary Grenade buys you the seconds to use the key.
Avoid the black floor panels. If you have 5 coins and want it, buy the Stabilizer as you cross the Central Cavern: it takes seconds.
Passage and Intersection. 2 Incendiary Grenade on the wooden boxes by the south door. A Fumer wanders the north side: run past it (it stops chasing once you go through the door) or slow it with a Neuro-stun Grenade. In the Intersection, Shotgun Ammo ×6 in the crate by the steamroller.
Dead End (a short detour, worth it). From the Intersection, turn right and follow the tracks down. Go right around the crashed mine cart and crouch through the gap. In the southwest corner: free Steroids on the barrel, Antique Coin (#10) on the tarpaulin and Shotgun Ammo ×12 on the barrel. On the southeast barrel, RAMROD ×3 and a Neuro-stun Grenade. Head back and on to Work Sector B: as you near its south side, containers drop and shut you in and the Mama Mold fight begins (see below). The clock does not stop.
The liquid nitrogen. With the Mama Mold dead, push the green crate covered in yellow tape in front of the big truck: the liquid nitrogen containers are behind it. Use them before time runs out and Chris freezes the bomb off his arm. The Storage Space links Work Sector B to the Work Sector Entry: it is the shortcut back.
Store Room West and last errands
Store Room West (optional, recommended). Go back through the green shutter and open the clown door in the Storage Area Passage with the Clown Key. Inside: a free Stabilizer on the small round container on the floor, a Med Injector in one crate and a Strong Med Injector in another.
Check before the console. This is your last visit to the mines. Make sure you have:
- All 10 Antique Coins and both birdcages bought (Steroids 3 + Stabilizer 5).
- The Steroids from the Dead End and the Stabilizer from Store Room West.
- The container in the northeast branch of the Mine Cart Yard Passage opened with the S1 Lock Pick (RAMROD ×2).
- A boss-ready inventory: every RAMROD, the Incendiary Grenades, a full shotgun and your healing. Leave the rest in the box.
Point of no return: the Shield Machine
Save in the Central Cavern and use the Clown Key on the console by the tape recorder. Assume you will not be back in the mines after this.
Shield Machine Entrance (the supply vault). Take everything: Shotgun Ammo ×20 on the wooden box in the southwest corner, Incendiary Grenade on the gas canisters on the south side, a Grenade and 2 Med Injector in the plastic trays in the southeast corner and RAMROD ×3 in the crate on the south side. Equip both grenade types and take the knife off your quick slots.
Interior 1F: three waves. These Molded are tougher (3,500 HP, per a datamine):
- 8 Molded, 1 Fat Headless Molded and 1 Fumer.
- 4 Crawler Molded, 5 Molded and 1 Fumer.
- 2 Fat Molded crash through the barricade in the middle.
Stand on the steps you came in by so they cannot surround you. Handgun and punch while you can; switch to the shotgun after 4-6 kills. Keep a RAMROD loaded for each wave’s Fumer. For the Fat Headless, one shotgun shell from range. For the Fat Molded, a Neuro-stun Grenade and shotgun to the head; one source says a single RAMROD to the head kills one on Normal. Their vomit and charge can be blocked. RAMROD ×2 on the stacked caged containers in the southeast.
Interior 2F. If you run short, go up: RAMROD ×4 and Shotgun Ammo ×12 on the gas canisters in the southeast and two breakable crates in the same southeast corner with Shotgun Ammo ×6 each (12 in total).
The self-destruct. After the third wave Lucas sets off the self-destruct: use the floor vent to the left of the entrance door; if it doesn’t respond, try the one on the right, and crawl out before the countdown hits zero. You come out in the Research Facility cavern.
Research Facility
Cavern and Corridor 1. You cross a dark cavern (the visor switches on by itself) to Corridor 1: the gun turret by the west gate comes alive once you restore the power in the Power Room, and the locked toolbox in the northwest (Lock Pick) holds RAMROD ×2: come back with the Clinical Lab pick. Carry on through Corridor 2 to the Lobby.
- Monitoring Room: RAMROD ×2 on the northwest edge of a desk.
- Experimentation Room (the padded white room, past the Sterilization Room): 1 Molded comes out from under the bed and 2 Fumers stand beside it; two RAMRODs, one to each chest. Med Injector on the trolley at the foot of the bed, the file Eveline Observation Log on the small trolley in the northeast and RAMROD ×2 on the tall metal drawer unit in the southeast.
- Lobby 2F: a Molded lying on a stretcher in the east alcove springs up: kill it first. Handgun Ammo ×8 on the shelves southeast of the alcove, 2 Grenade in the large metal locker in the alcove, the file Researcher’s Journal hanging out of a locker in the same alcove and Handgun Ammo ×8 on the cardboard box in the northeast corner.
- Power Room (the maintenance room opposite Lucas’s office): flip the switch. The door to the right of his window opens and he flees. A turret fires down the hallway: duck into the office on the left.
Clinical Lab (last safe room)
Tape recorder on the operating table and item box on the south wall. Files: Email Log on the laptop on the middle table, Lucas’ Journal on the table in the northeast and Note on the Wall on the southwest wall, left of the blue door. Also: 2 Incendiary Grenade on the small trolley to the east, Handgun Ammo ×6 on the cabinet in the southwest and the Lock Pick in a bowl on the operating table.
The blue door leads back to the facility entrance: go back through it to Corridor 1 and open the toolbox with the Lock Pick (RAMROD ×2). By then the turret by the west gate is live: crouch to pass under its line of fire. Save here with your kit ready for the boss: RAMRODs, Incendiary Grenades, a full shotgun and healing.
Back Corridor. There is a gun turret, but it is out of ammo by now; Shotgun Ammo ×8 in the metal locker in the west alcove. At the end, the Cultivation Lab: walking in starts the Lucas fight, so arrive healed.
If you play on Professional
- Weapons: you start with the knife only. The Samurai Edge is on the barrel in the northwest corner of the Departure Yard and the Thor’s Hammer on the metal shelves in the northeast of the Ventilation Room. There is an extra item box in the North Cavern (top of the stairs, by the Cultivation Room door).
- Central Cavern: on first entry about 6 Molded and 2 Crawler Molded attack. Shacknews trick: open one of the coloured roller doors, stand in the doorway and sidestep inside without letting it close; the Molded despawn and you can save (they respawn, so be quick). Kill a couple, repeat the trick and save again.
- Birdcages: they sell Steroids for 4 and Thor’s Hammer Sight C for 6 (exactly 10 coins; you must collect them again every run). The Stabilizer is only in Store Room West and there is no Steroids in the Dead End.
- Work Sector A: the Mama Mold appears as soon as you enter the central area, with 5 Molded according to Evil Resource (Shacknews counts about nine). Kill the regular Molded along the tracks on the right side and save between batches. As soon as you step into the central area the Mama Mold charges: block right before it hits to deflect it and, while it staggers, pick up the Crank (Shacknews takes it in that central area, as on Normal) and the items. Stun it again before you fit the parts and turn. Do not stand too close while baiting the charge: it vomits instead.
- Sewage: the code is the same, up, down, up.
- Lock Pick: there is just 1 (Holding Yard, on a barrel in the south area, past the barrier), which opens the container on the Central Cavern’s southwest platform (RAMROD ×3).
- Repair Yard: it is full of tripwire bombs: take your time reaching the clown. The breakable crate in the room is a Lucas trap: do not hit it. Once you take the key, keep a tripwire between you and the Crawler Molded and block as they leap: the bomb kills them.
- Antique Coins: only 2 stay put (the paint bucket in the Mine Cart Yard Passage and the tarpaulin in the Dead End); the other 8 are in the Central Cavern (on the south side of the white vehicle), S2, S1 (stretcher), the Back Passage, the Ventilation Room (box by the switch), the Mining Work Area Passage, the Storage Space and Store Room West.
- The deflect window is shorter and, if you play badly, enemies hit 20-40 % harder for a while. In Marquez’s room, pistol the Little Crawlers before they touch the wires: the blast kills you both. Grenades disable the turrets.
Boss — Mama Mold
Arena: Work Sector B, with a big truck in the middle that is your best cover and a smaller vehicle to the north. The fallen containers shut you in and the 10-minute bomb keeps ticking.
Health and weak point: 50,000 per a datamine. It is white: nothing hurts it until a RAMROD hits it, which exposes its brain. On Normal a RAMROD does 2,520 to it, a normal bullet 420 and a Grenade 1,680; Incendiary Grenades and Neuro-stun Grenades do only 350.
Arena ammo (Normal): grab it as you circle the truck.
- Med Injector inside the vehicle on the north side (under the seat).
- RAMROD ×6 in the crate in the northeast corner.
- Shotgun Ammo ×12 on the crossbars of the metal structure in the northeast corner (on your left as you enter).
- 2 Grenade on the back of the truck and Shotgun Ammo ×12 on its front hood.
- Med Injector in the crate on the west side of the truck and Handgun Ammo ×6 in the crate in the southwest corner.
Steps:
- Load a RAMROD and shoot it once. It loses its immunity and its brain is exposed. Do not spend more RAMRODs on it.
- When it is stunned, run in and punch the weak point: big damage and knockback.
- Switch to the shotgun and Grenades: drop one at its feet when it stands still and shoot the head.
- Stay at mid range. Too close and it vomits toxic bile (you can block it, but it hurts a lot up close); too far and it charges with wild arm swings: run and keep the truck between you.
- Little Crawlers: it spawns them endlessly. Knife them, let them burst on their own or clear a group with an Incendiary Grenade, which is what those are good for here.
- Expect it to eat a good share of your ammo and a couple of minutes, even on Easy. It explodes when it dies: back off. On Professional, one guide stuns it about 3 times with RAMRODs and shotguns the exposed head.
Reward: access to the liquid nitrogen (push the green crate with yellow tape) to get the bomb off.
Boss — Mutated Lucas
Arena: the Cultivation Lab, with a large machinery structure in the middle and 2 wall-mounted oxygen tanks lit green. Smash every crate before you move on. On Normal:
- Northeast desk: Shotgun Ammo ×48 and Handgun Ammo ×20.
- East desk: 2 Strong Med Injector.
- Edge of the central machinery: RAMROD ×2.
- Breakable crates: two in the southwest (Handgun Ammo ×6 and Shotgun Ammo ×6), two in the middle (Handgun Ammo ×6 each), one in the southeast (Shotgun Ammo ×6) and two in the north (Shotgun Ammo ×6 each).
- In total, 38 handgun rounds and 72 shells in the arena.
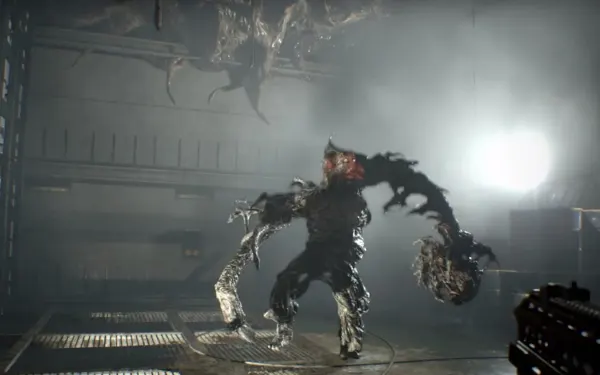
Health and weak point: 28,000 per a datamine. Anywhere but the chest he cuts damage by 75-85 % (grenades are not reduced). The head glows red: shoot it until he goes into shock; then the chest opens and takes full damage (a RAMROD does 2,500 on Normal). He is invulnerable while he recovers and while he roars.
Attacks:
- Close range: a vertical slam, a horizontal right-tentacle strike (crouch under it), a slow left jab, a left backhand he uses to back off, and a grab that kills you outright unless you block or deflect it. All of them can be deflected, and deflecting the grab puts him straight into shock with a cutscene.
- Mid range: a spinning-arm jump attack that cannot be deflected (sprint to one side or get behind the machinery) and a 3-4 hit alternating combo that can chain into the grab: keep your distance or deflect to break it.
- Phase 2 only: an acid stream from his left hand: take cover behind the machinery, or get close and crouch.
Phase 1:
- Lucas drops from the lump in the ceiling. Do not shoot while he roars.
- Incendiary Grenade: a guaranteed stun as long as he is not already flinching. Then shotgun or normal handgun rounds to the head until he goes into shock.
- With the chest open, RAMRODs to the chest. About 5-6 RAMRODs’ worth of chest damage starts phase 2. Save more RAMRODs for the second phase if you can.
- Kite him around the corners of the machinery so he never has a straight line to you, and deflect (L) his close hits for a few seconds of stun.
Phase 2:
- He jumps on top of the central structure, complains of head trauma and his arms mutate. When he jumps down from the structure, he attacks as he lands if you are close: do not stand next to it.
- He fills the room with spores that drain oxygen even with the High-Grade Filter. Refill at the 2 green wall tanks, but only at about 10-30 %: they take a long time to recharge.
- Repeat: head until shock → chest. Now he shields his chest with an arm: do not shoot the arm, wait for the opening. He recovers faster; one guide handles it like this: Incendiary Grenade, two shotgun blasts to the head, another Incendiary Grenade and a RAMROD to the chest.
- Use the Strong Med Injectors from the desk here if you need them.
Reward: Chris finishes Lucas with a shotgun blast to the head and shoots out his computer, so Eveline’s data never reaches the buyer. End of the episode. Rewards that land in the item box (per Fandom and other guides): Thor’s Hammer Sight B (less accuracy, much more damage) for a clear (one source says on Normal), Infinite Ammo (Not a Hero) for a Professional clear (bullets, shells and RAMRODs, not grenades), Easy Deflect (a wider deflect window) for a clear in under 1 hour on any difficulty, and Fast Walk for a clear with all 10 Antique Coins (sources disagree on the difficulty required). Achievements: Mission Accomplished (Easy or Normal) and You’re the Hero Now (Professional).
Before you use the Shield Machine console you should have: all 10 Antique Coins (#1 in the Central Cavern, #2-#3 behind the red shutter, #4-#6 behind the green one, #7-#9 behind the blue one and #10 in the Dead End during the bomb) and both birdcages bought · the Steroids from the Dead End and the Stabilizer from Store Room West · the Mine Cart Yard container opened with the S1 Lock Pick · every RAMROD you found (keep a dozen for Lucas), the Incendiary Grenades and your healing. And save.
Don’t leave without: the lab files (Eveline Observation Log, Researcher’s Journal, Email Log, Lucas’ Journal and Note on the Wall) · the second Lock Pick (Clinical Lab → the Corridor 1 toolbox, RAMROD ×2) · every Cultivation Lab crate smashed before you walk towards Lucas.